

It's 2013! It's nearly spring and I for one am ready to take on new and exciting challenges. I always find this time of year revitalising. I am looking forward to a productive year and this newsletter should help with great technical articles to improve your productivity and efficiency using our tool.
I hope you had a good end of year break and celebrated with colleagues and friends. I realise it's a while back already! My new picture (left) is a good reminder of our get together with the Alchemy Team and eating some scrumptious tapas in a great Dublin pub. It was a great evening with everyone in flying form. In fact, if you are visiting Dublin, give me a shout and I'll give you the name of this good establishment. And no, I am not eating a worm, it's calamari :-)
Don't forget to let me know if you have any topic you would like covered in this TechBytes newsletter.
Cyril Vallin
Product Support Manager at Alchemy Software Development.
Catalyst 10 SP1 out soon!
I wanted to share exciting news about the release of Catalyst 10 Service Pack 1. It is now in its final phase of testing and will be with your shortly.
In addition to a number of important updates, this release includes a brand new integration with Acrolinx Server. Acrolinx is widely used by technical authors to help create better content by checking against corporate standards for terminology, spelling, grammar, style, and more. Catalyst’s ability to integrate with these online checks extends our cloud validation paradigm and ensures that translated content also meets these exacting corporate standards.
Follow us on Twitter
Adding to our YouTube channel, I'm happy to say we have launched our twitter page giving you even more ways to keep up to date with developments. Click the Twitter button above to follow @AlchemySoftDev.
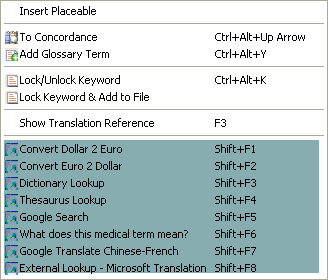
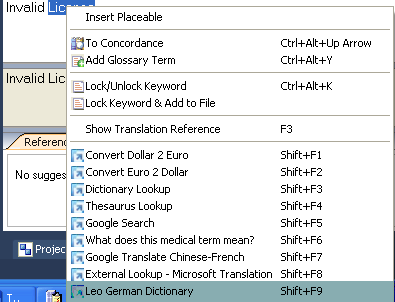
Right clicking in the Translator Toolbar lets you not only lock/unlock keywords, add terms to the Glossary, perform a Concordance search and insert placeables – but also allows you to invoke External Commands.
The main concept of the External Commands is to run external apps and pass a selected piece of text (from Translator Toolbar) to them.
By default, the following External Commands are included in Catalyst 10, highlighted below:
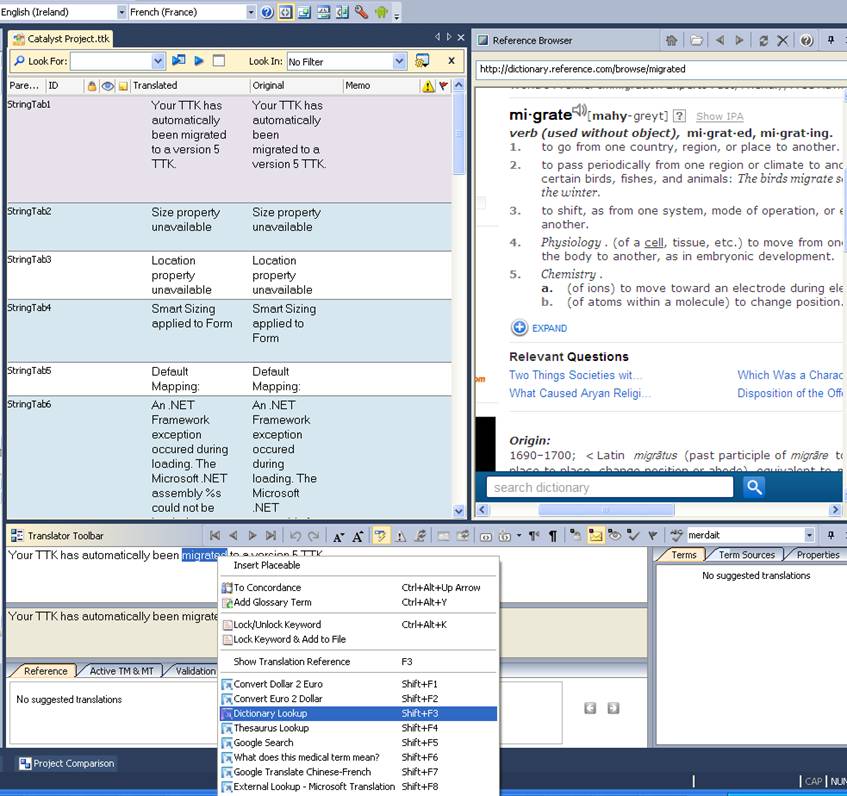
Let's take an example. I would like to look up the word “migrated” on Dictionary.com. I highlight the word in the translator toolbar, right click and choose Dictionary Lookup (or press Shift+F3).
Catalyst will open the web site Dictionary.com with the entry for migrate in the Reference Browser.
The feature is very versatile as it is fully customizable. You can exclude external commands you don’t need or add more to the list. This configuration is achieved modifying the external_commands.xml file in the public folder:
Windows XP C:\Documents and Settings\All Users\Alchemy Software\Catalyst 10.0 Microsoft Windows Vista / 7 / 8 C:\Users\Public\Alchemy Software\Catalyst 10.0
The external_commands.xml can be opened with any text editor program such as Notepad, Wordpad or in my case Notepad++. It will look like this:
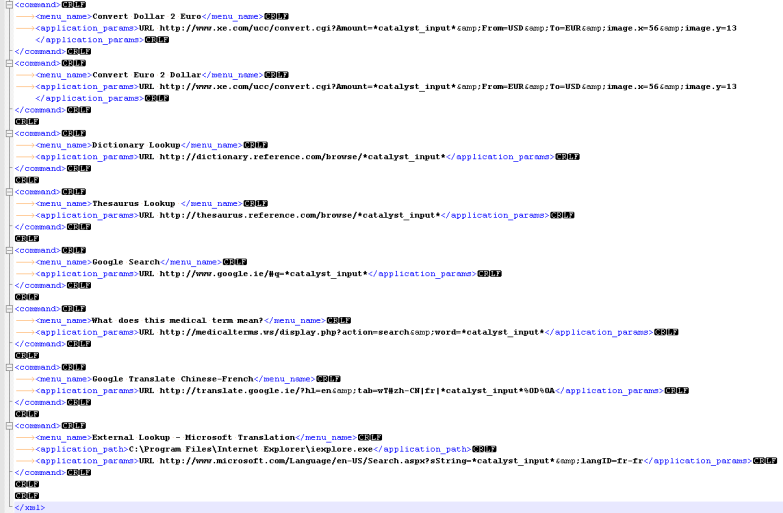
Now, for example, if you would like to remove the Dictionary Lookup command, you only need to delete the correct command tag (and contents). In this case it is:
<command>
<menu_name>Dictionary Lookup</menu_name>
<application_params>URL https://dictionary.reference.com/browse/*catalyst_input*</application_params>
</command>
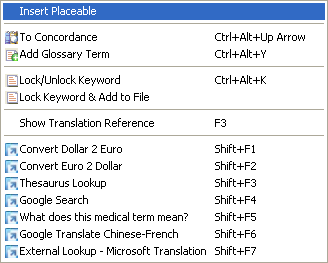
Save and close the file. If you then right click in the Translator Toolbar again, the Dictionary Lookup option is gone. The Shortcut keys are automatically assigned in sequence, meaning you do not need to worry about customizing the shortcuts or insuring there are no duplicates.
Removing an External Command was fun :-) Let's now add a new External Command which searches the dictionary Leo for the "English -> German" translation of words I highlight in the Translator Toolbar. I open the external_commands.xml file in my text editor and add a new command tag:
<command>
My new command will be called “Leo German Dictionary”. This is the label which will be displayed in the Right-Click menu in the translator toolbar. To set the name use the element menu_name:
<command>
<menu_name> Leo German Dictionary</menu_name>
You can send the command to a different application, such as your browser. To achieve this, you use the application_path element. In this example, I will send the External Command to the Chrome browser, thus I use the application_path element and enter the path to the program's executable.
By default, not using this element will send the command to Catalyst Reference Browser
<command>
<menu_name> Leo German Dictionary</menu_name>
<application_path>C:\Documents and Settings\jettef\Local Settings\Application Data\Google\Chrome\Application\Chrome.exe</application_path>
Next, I need to point to the dictionary web page using the application_params element.
<command>
<menu_name>Leo German Dictionary</menu_name>
<application_path>C:\Documents and Settings\jettef\Local Settings\Application Data\Google\Chrome\Application\Chrome.exe</application_path>
<application_params>URL http://dict.leo.org/ende?lp=ende&search=*catalyst_input*</application_params>
Please note that you need to replace all & characters with the html character & in the URL.
If you would like to look up your selected word directly you need to use the parameter *catalyst_input* after search in the URL. It will substitute the parameter with the selected text in the translation toolbar.
The original URL from the web site after I performed a translation query for the word "Test" was...
http://dict.leo.org/ende?lp=ende&search=Test
... so I changed this URL like so in the application_params element:
http://dict.leo.org/ende?lp=ende&search=*catalyst_input*
Finally I need to close the command element tag. The final External Command entry looks like this:
<command>
<menu_name>Leo German Dictionary</menu_name>
<application_path>C:\Documents and Settings\jettef\Local Settings\Application Data\Google\Chrome\Application\Chrome.exe</application_path>
<application_params>URL http://dict.leo.org/ende?lp=ende&search=*catalyst_input*</application_params>
</command>
After you have saved the changes you can use the new command straight away without relaunching Catalyst.
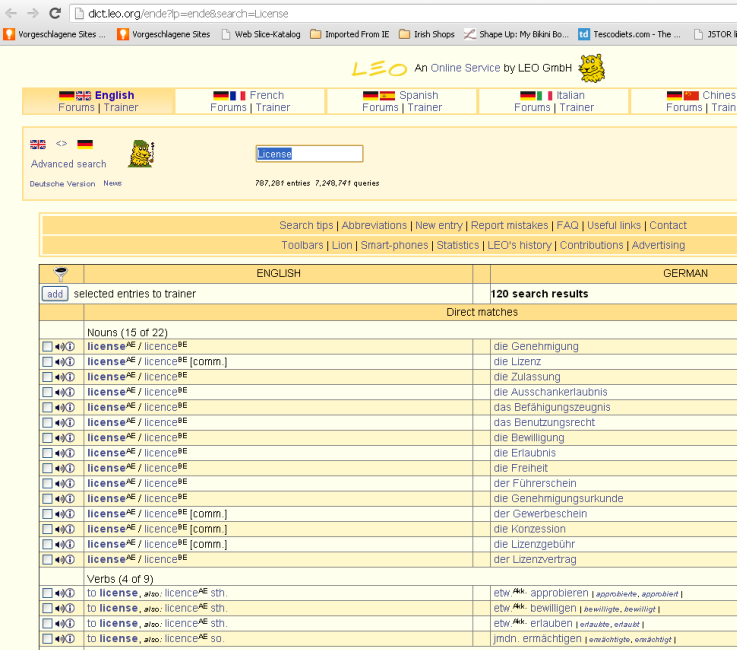
After selecting the word license and sending it to the Leo German Dictionary External Command, a new Chrome browser instance is opened with the search results.
A few users have asked if it's possible to display the ezScript exit code in the DOS prompt rather than have to open the log file each time an ezScript command is performed. So I looked into it and found a solution I felt I should share. This is relatively handy when testing out new automation steps with ezScript and particularly useful if you want to insure you had a license available if you are using an ANLM (Alchemy Network License Manager).
You can view the exit code by using this DOS command after an ezScript command:
echo %errorlevel%
So for example my batch file would look like this to create a TTK:
catalyst /M cyril TTKName:"C:\AAA_working\1_EzScript_files\MyProject.ttk" "C:\AAA_working\1_EzScript_files\source\mspaint.exe" SourceLang:"English (United States)" TargetLang:"French (France)"
echo %errorlevel%
As a result, if a license is available and the command was successful, I will see the following in the Command Prompt:
catalyst /M cyril TTKName:"C:\AAA_working\1_EzScript_files\MyProject.ttk" "C:\AAA_working\1_EzScript_files\source\mspaint.exe" SourceLang:"English (United States)" TargetLang:"French (France)"
echo 0
The exit code is 0, meaning that it was successful.
However, if a license was not available when running the commands, I would see
catalyst /M cyril TTKName:"C:\AAA_working\1_EzScript_files\MyProject.ttk" "C:\AAA_working\1_EzScript_files\source\mspaint.exe" SourceLang:"English (United States)" TargetLang:"French (France)"
echo 20
Exit code 20 suggests that no license is available to run Catalyst successfully. This is the same exit code you would see in the ezScriptBatchLog.
You can review the Exit Code list in our KnowledgeWell.
You already know that you can run the Validation Expert on your TTK project or on selected files in the navigation pane. However, did you know you can Validate as you work, running an Automatic Online Validation on each string while you translate?
While this is a key feature for the Translator inputting translations for the project, this can also be very useful to the Localisation Engineer or the Project Manager as they troubleshoot L10n (Localisation) bugs or review translations.
To select the validation test that Catalyst should perform while you are translating, go to Tools > Options > Validate Expert.

There you can select or deselect all the validation tests available in the Validate Expert.
If you would like to learn more about the Consistent Pattern, Correct Translation and Invalid term tests please have a look at our TechByte Newsletter from May 2012.
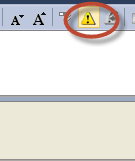
After selecting your validation tests click OK and then turn on automatic validation in the Translator Toolbar by clicking on the yellow triangle icon.
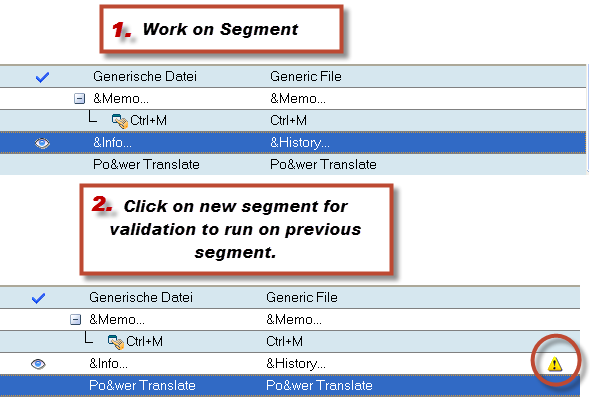
When this option is enabled all selected tests are performed when you advance to the next segment, meaning when you press the Return key.
Any error will be highlighted with an exclamation mark yellow triangle as per the screenshot below.
If you would like to run the validation test on your current segment, without moving to the next one, you can also press F5 for an on demand testing.
Tip: Even if you do not turn on the Automatic Validation, you can always validate your string by pressing F5.
You may review the validation errors in the Validation Errors tab in the translator toolbar. Correct the reported error(s) and press F5 to retest. Once all errors are corrected, the yellow triangle will disappear validating the string of any mistake.
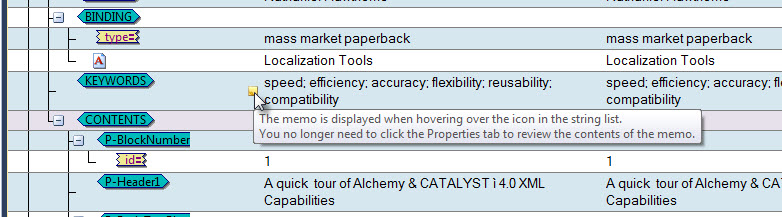
Adding a memo to a localisable string is something which has been in Catalyst since... well for ever really! But this is not to say there was no room for improvement. Many of you have said it would be nice to see the memo in the string list. Going to the Properties tab each time you need to review a memo is time consuming when you are a fast paced translator. So we have enhanced it in Catalyst 10.
You may not have realised but if you hover over the Memos in the string list, it will display a tooltip with the contents of the memos, like so:
Entering a memo for a string consists of clicking the string, going to the properties tab and entering the desired text in the memo field. So the memo entered in the above screenshot looks like this in the Properties tab:
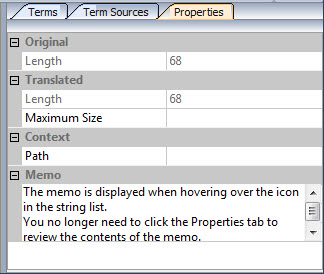
It is possible to enter carriage returns in your memos to make them more readable (as seen in the above example). A memo will not be registered until you click anywhere else in the Catalyst interface; clicking the string list or the translator toolbar for example. This is necessary as the carriage return is allowed in the memo field thus it cannot be used to register the memo for the string. Most of the time you will not even realise as you will instinctively click somewhere else in the interface to continue your work after entering a memo.
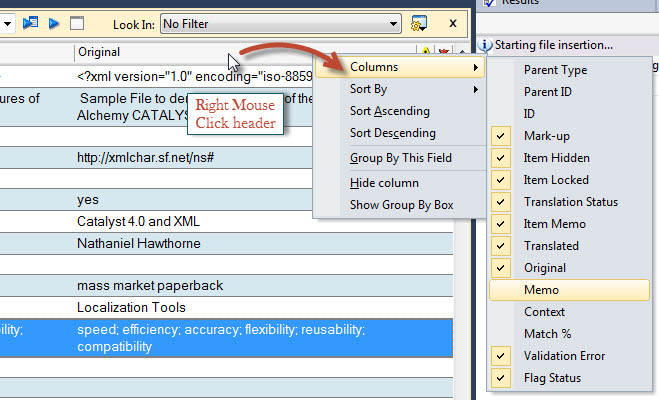
Of course let's not forget you can always display the contents of the memo in the string list as a column (see below). And remember, in Catalyst 10, you can search the memo fields, as we reviewed in the August 2012 article.
Parsing memos from XLIFF files
When parsing an XLIFF file, it is possible to parse memo information. This is only possible with this file format.
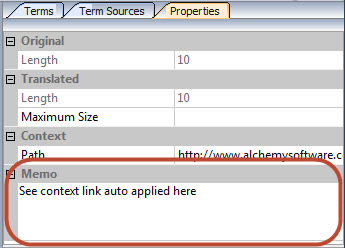
Alchemy Catalyst parses the <note> element and stores it in the memo field of the associated localisable string.
For example, the following translation unit inserted in Catalyst
<trans-unit id="130">
<source>Align left</source>
<target>Align left</target>
<note>See context link auto applied here</note>
<context-group name="images">
<context context-type="x-reference">http://www.alchemysoftware.com/demofiles/context_links/left.jpg</context>
</context-group>
</trans-unit>
will result in the Memo "See context link auto applied here" added to the "Align left" sting. In the string list the memo icon and the memo can be visualised:
![]()
The memo itself can be edited in the Properties tab on the right of the Translator Toolbar:
Memos added to a translatable string in Catalyst will be added to the XLIFF file on extraction of the translated file. There is no requirement for the string to have the <note> element in the original source file.
Thanks for taking the time to read this installment of TechBytes. It has been fun to write and I hope you found some if not all of it beneficial. We always welcome new article ideas, so if there is a feature you feel works really well and is worth mentioning, or indeed if clarification on a particular topic would help you, please let me know so together we can make TechBytes as useful as possible for everyone.
My best wishes
Cyril Vallin
![]()