

My name is Cyril Vallin, I am the Product Support Manager at Alchemy Software Development. This TechBytes quarterly Email is to share the experiences from our users so that we can all benefit and enhance our use of Alchemy technology. In Support we sometimes see similar topics being queried and I hope that sharing this knowledge will promote advancement amongst our users.
TechBytes will bring you a mixture of ezRead :-) articles on your hot topics as well as event updates and also some more detailed drill-downs into the product's code or white papers. I really encourage you to share your experience and skills by submitting articles, or article suggestions for this recurring Email.
What's new in Catalyst 10 Videos
A video channel has been created with some new videos on the new features of Catalyst 10.
If you are a new user or know of friends, colleagues or partners who are interested to evaluate, those videos are a great starting point.
Check it out on YouTube: What's new in Catalyst 10
Summer conference - Andover
We would like to thank all of you who attended the Andover Summer Conference on 18th of July 2012. It was a great success and fantastic to meet you there. Keep an eye for our upcoming events in 2012 & 2013.
Catalyst 8.0 introduced Machine Translation with the ability to get a translation on a string basis. Now with Catalyst 10 you can fully translate your project with Machine Translations, in one leverage step!
For those of you familiar with Catalyst 8.0 or 9.0, you will notice the Machine Translate button ![]() is no longer in the toolbar of Catalyst 10. This is because Machine Translation engines are now used like a TM (Translation Memory). This enables you to machine translate large volumes of segments automatically. In the Leverage Expert you can use the GoogleMT or PromptMT connectors as TM. And you can of course still use those engines as Active TMs which will offer you translations as you work on each individual string, like so:
is no longer in the toolbar of Catalyst 10. This is because Machine Translation engines are now used like a TM (Translation Memory). This enables you to machine translate large volumes of segments automatically. In the Leverage Expert you can use the GoogleMT or PromptMT connectors as TM. And you can of course still use those engines as Active TMs which will offer you translations as you work on each individual string, like so:

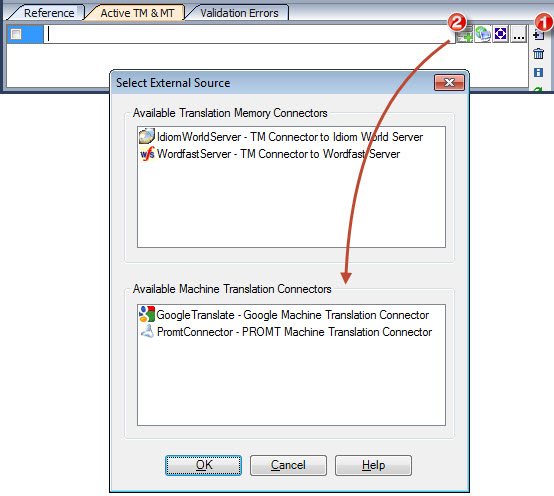
To set up a Machine Translation connector, the principle is the same in the Active TM & MT or in the Leverage Expert. Click the Add button (1) and select External source (2). You will then see the dialog in which you can opt for the GoogleMT or PromptMT connectors. Click on the desired connector.
When selecting the PromptMT connector, a dialog will popup with details of service. You are not required to enter a username and password. Just enter the Proxy server settings (if applicable) and click the Connect button. Once connection is successful you can click OK.
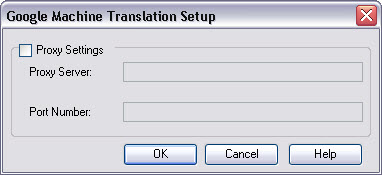
When selecting the GoogleMT connector, Catalyst will automatically test if it is able to connect to the Internet using Internet Explorer's proxy settings and set the connector. Should the Internet connection fail, you will be prompted to enter the Proxy settings:
Using Machine Translations
When a string has been translated from Machine Translation, it's status is set to Machine Translated. For example below, the file in the TTK has been fully translated from Machine Translations. The status icon appears beside the file in the Navigation pane (as all strings have the exact same status) and beside each segment in the string list.

You may of course opt out of using Machine Translations and even restrict it's use in your Catalyst project. To do so, select the Disable Machine Translation in any projects I create option. Go to Tools menu > Options > Application
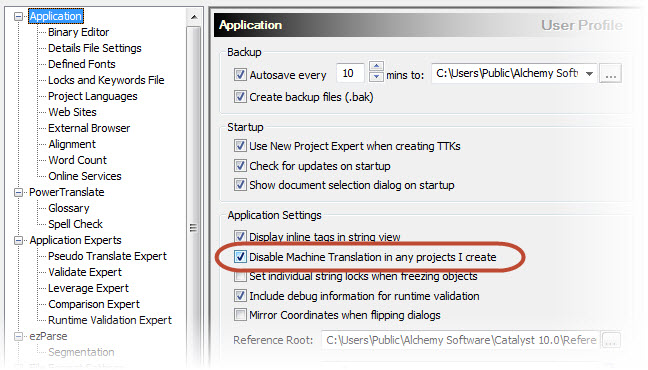
Note that if a project is already opened in Catalyst, even without any file inserted yet, this option will not apply. You will need to create a new project after turning Disable Machine Translation in any projects I create on.
With this option selected, a warning will appear if you use Machine Translations, whether you attempt to Machine Translate an individual string (Alt+Home) or using the Leverage Expert.

A search function in any tool is key, right? Taken for granted it is used probably more than any other feature in Catalyst. Many of you have requested the ability to search strings by IDs, Memos or use sub searches. So we have listened and implemented it all and more in Catalyst 10 :-)
QuickFind Bar
First let's look at the improvements made to the QuickFind Bar, located above the string list.

If this is not showing or you closed it by mistake, bring it up in View menu > QuickFind Bar.
Most of you will be familiar already with this bar so I will focus on the great improvements made to it's functionality.

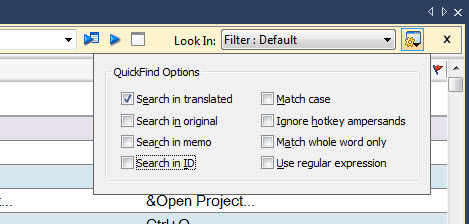
1- The Refine QuickFind (Ctrl+Enter) button will now allow you to search a sub set of strings from the previous search, the last search results.
2- The QuickFind options button will enable to refine the way you perform the QuickFind.
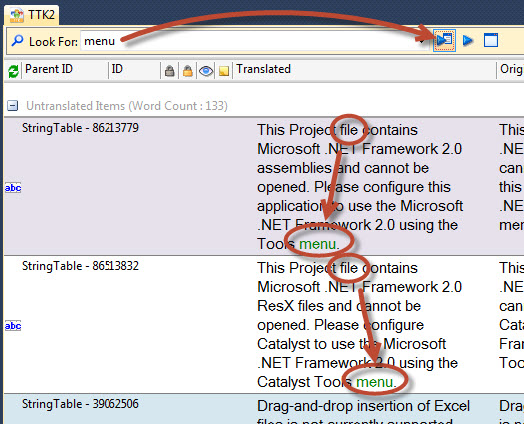
Let's take an example, I want to search for strings containing the word File, and then search for any string containing the word menu in the results of the first search.
First I enter File in the Look for field and click the Perform QuickFind button, better I press Enter.
This results in a long list of strings all containing the word File.
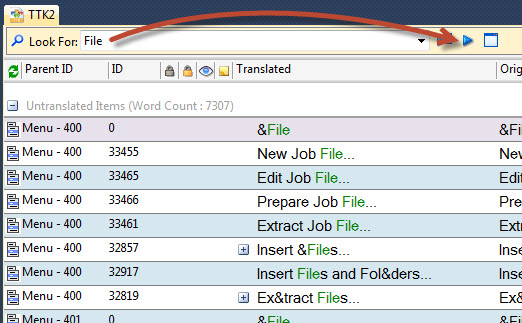
Then I enter the word menu in the Look For field and click the Refine QuickFind button, better I press Ctrl+Enter.
We now have all the strings which contain the word File and menu.
You can continue to refine the QuickFind as many times as you want. Entering words in the Look For field and pressing Enter (or pressing the
Perform QuickFind button) will the search the entire project or selected resources in the Navigator pane. You can clear the QuickFind with the ![]() button or press Ctrl+Alt+Enter.
button or press Ctrl+Alt+Enter.
You'll find that with the shortcut keys (Enter and Ctrl+Enter), you can very quickly search your string list. You can also refine the search with the second addition to the QuickFind Bar.
With all those options, there is nothing you can't successfully search for. Reviewing or Bug fixing will be a lot easier and faster with the new improved QuickFind.
Advanced Find & Replace
The Advanced Find and Replace tool (Ctrl+F) has also been updated, now allowing you to search for IDs, Memos and search Whole words only.
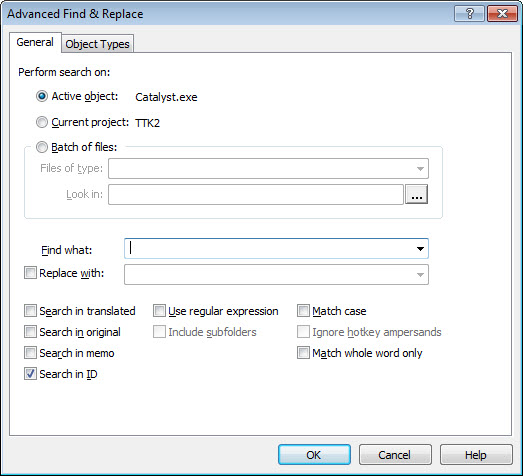
Ctrl+F is a reflex at this stage! Anytime you want to search strings in your project, you systematically press this key combination to pop up the search dialog and enter what you are looking for. Unlike the QuickFind however, the Search and Replace tool will report all search hits in the Result pane. Each individual hit an hyperlink which will send you to the string in the String List.
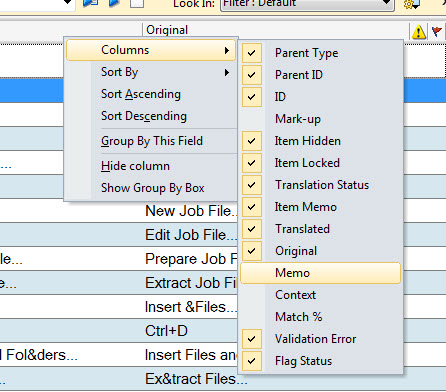
So you can now search for IDs or Memos. The memo column is not displayed by default, so it's a good time to demonstrate how there are further columns available which you can add to your String List. You can of course remove any column you don't use in the same manner. Right-click the String List header > Columns > select the column you wish to show/hide.
With regards searching with Match whole word only option on, this option restrict searches to complete words. For example if you wish to search for the word 'can', but don't wish to be returned 'cancel', or 'cannot', opt to match on whole words only.
The Update Expert is used to replace a Catalyst project file with a new revision while also performing a translation leverage. You should use this expert to replace a small number of source files within an already created TTK project file, with newer revisions.
Up to Catalyst 9, this option was only available for Win32 executables and dll files.
Now, in Catalyst 10, the Update Expert has undergone an update itself.
It now supports all file formats.
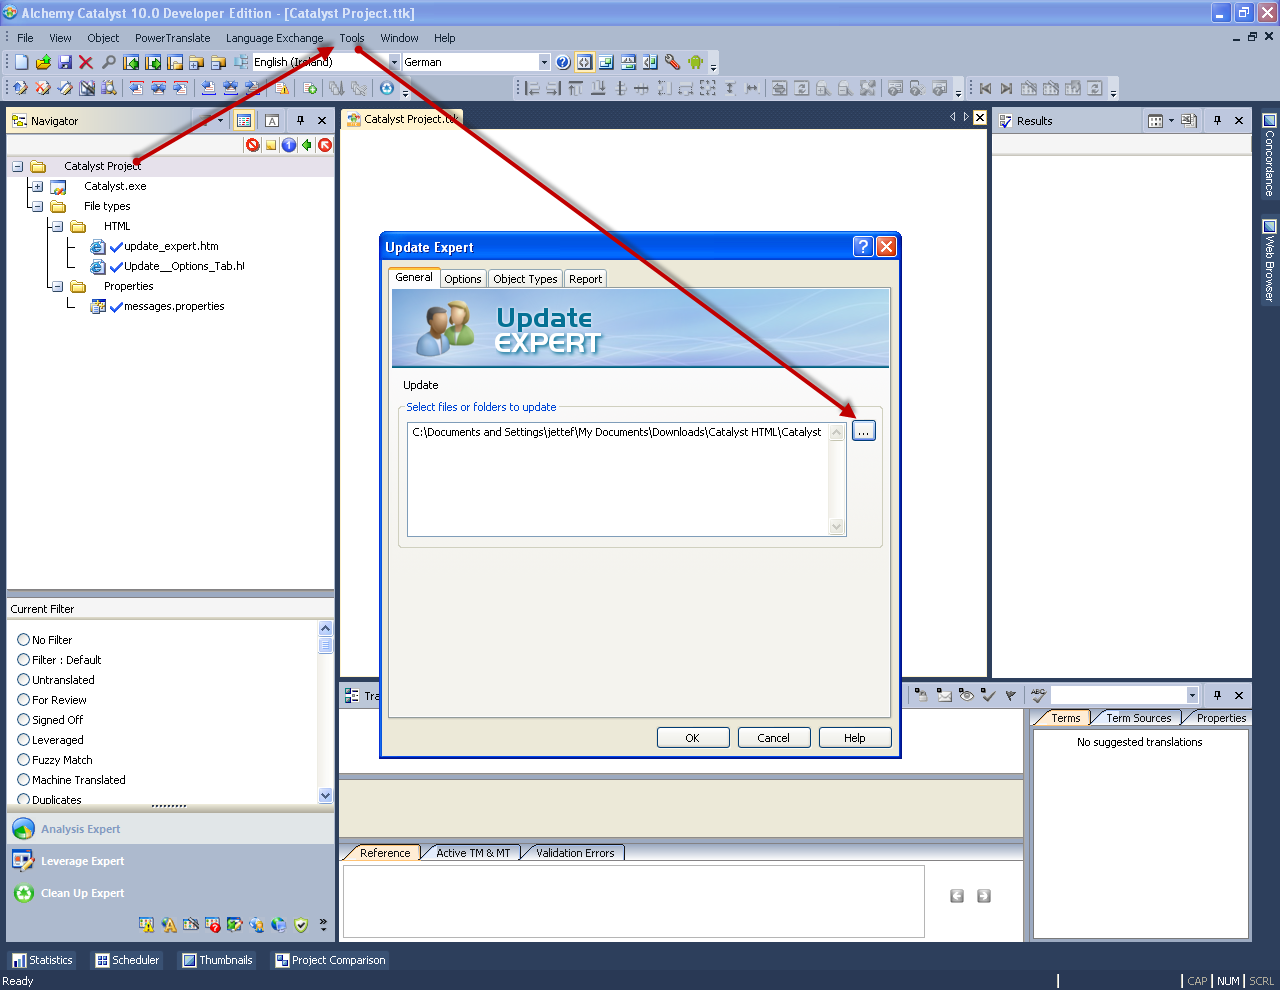
Highlight the folder you like to update in the Navigate pane and go to Tools > Update Expert, browse to your folder containing the updated files and click OK.
Alternatively, if you only want to update a single file, right click on the file and choose Tools > Update Expert or press Ctrl+U.
When updating a folder structure in your project, Catalyst expects to find a matching directory structure on Disk.
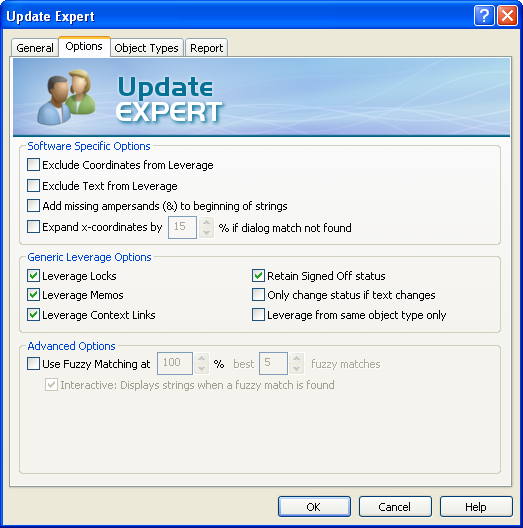
After you have selected your updated source file, you can set your leverage options in the second tab called ‘Options’, just like you would in the Leverage Expert.
You also have the option to run a report during the update process. The report will show you a quick overview of the leveraged files. This will give you an indication of how many new words the updated file contains.

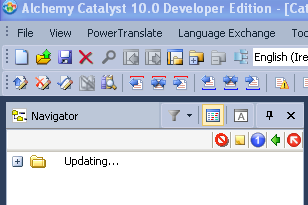
Note, when choosing to update the whole project, once you click OK on the Update Expert, the status of the Project Title will change to “Updating… “.
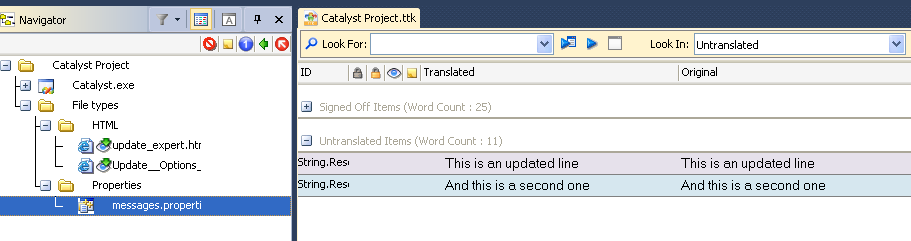
After the Update Expert has finished you will find that all original strings that have been signed off before will keep their signed off status if they are contained in the new set of files.
If you haven’t turned on fuzzy match in the leverage options, all new strings can be found under the untranslated item grouping.
With Alchemy Catalyst 10, translating MadCap Flare project file (*.flprj) is made easy. No need to select and insert individual files, just insert the project file and translate.
Inserting MadCap Flare project files
Before you insert your MadCap Flare project file, enabled the following two options which will help work with the project files:
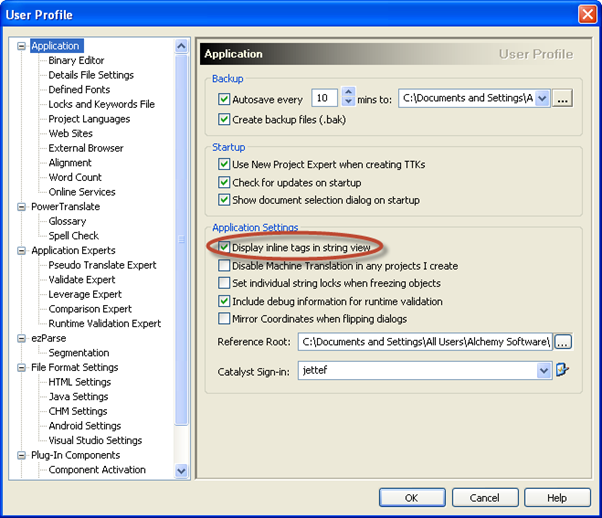
1. Display Inline tags in String View
Go to Tools menu >Options > Application
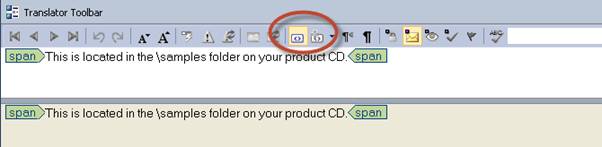
2. Show Tags at Extremities
Click on the below button in the Translator Toolbar.
After setting these two options, you are ready and optimized to create a Project TTK with MadCap Flare content. This process is simple. Point Alchemy Catalyst 10 at your *.flprj file via the File menu > Insert Files... All of the MadCap localizable content will be identified and parsed in the Project TTK, maintaining the original folder structure of the MadCap Flare project.
The *.flprj file has little content itself, but points to the location of all the localizable contents for that project. Alchemy Catalyst 10 parses this information and inserts all these localizable files.
This content can then be localized in the normal way, after which, the translated Flare project can be extracted from Catalyst and compiled in the MadCap Flare environment.
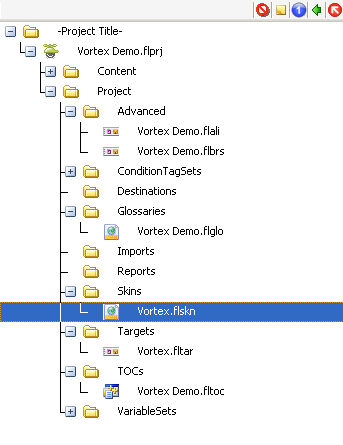
The majority of the content is in HTML format and can be displayed for localization in String View or Visual View. The root .flprj file is displayed with a MadCap icon for easy visualisation in the Navigator pane. In addition to handling the standard HTML formats, there are dedicated parsers for handling such specific Flare formats like the glossary files, variable files, skin files, tables of contents, style sheets, master pages, layout and snippet files. For example:
Managing MadCap Flare inline tags
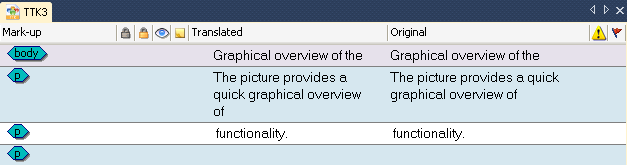
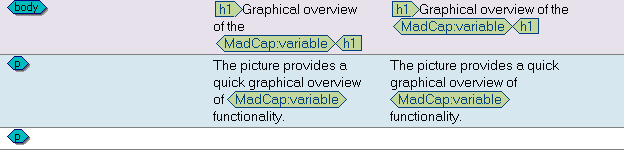
Once inserted, you may come across strings which seem broken, for example:
As the files are parsed as a standard HTML file, it is most likely a MadCap specific inline tag in the HTML which needs to be added to the InlineTags.txt file located in the public folder.
To check this, open the HTML file in a text editor and search the string. In this example I have found two instances of MadCap:variable tags which cause segmentation of the string when inserted in Catalyst:

To solve the issue, we need to add MadCap:variable to the InlineTags.txt file.
To amend the InlineTags.txt file navigate to the below location (Public folder), according to your operation system.
- Microsoft Vista & Windows 7 = C:\Users\Public\Alchemy Software\Catalyst 10.0
- All other Microsoft OS = C:\Documents and Settings\All Users\Alchemy Software\Catalyst 10.0
Open the InlineTags.txt file with Notepad (or your favourite text editor) and add MadCap:variable.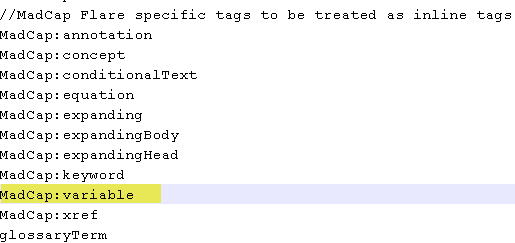
Note the above list of MadCap Flare specific tags is included by default. You will find MadCap:Variable already present in the list and is used here to demonstrate how the inline tags can be User managed.
Once you have added a tab and saved the file, you need to re-insert your project file so Catalyst can parse the contents correctly with the inline tags update. Inline tags will be displayed in the String list and translator Toolbar in green.
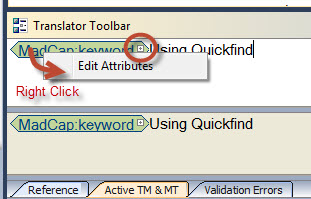
In some cases, you will find localisable elements as an attribute of the inline tags. A little + icon shows on the right of the inline tag in the translator toolbar. You can normally accessed the translatable string by right clicking the tag > Edit attributes.
 |
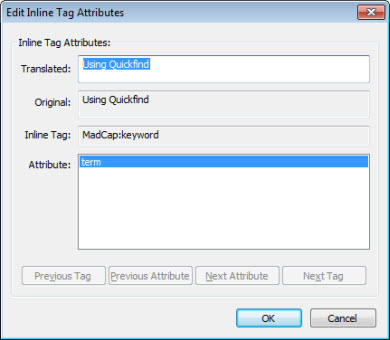 |
This however would not be reflected in the word count and would easily be over looked by the translator. Using a configuration file, config.xml, you can display the attribute values of MadCap inline tags. For example, the MadCap:keyword tag below actually contains a localisable element. The string is "Using Quickfind".

Reviewing the tag in the HTML file in a text editor shows the attribute name is term.

Knowing tag name and it's localisable attribute, you can create an entry in the config.xml with the following syntax:
<item name="Show HTML Attribute" detail="MadCap:keyword;term" option="TRUE"/>
Where detail's syntax is TAG;ATTRIBUTE.
A full config.xml file would look like this:
<?xml version="1.0"?>
<catalyst version = "10.00">
<task-control><item name="Show HTML Attribute" detail="MadCap:keyword;term" option="TRUE"/>
</task-control>
</catalyst>
You can easily create the config.xml file in Notepad; simply copy the above code into a text file and save it as config.xml in the Public directory:
- Microsoft Vista & Windows 7 = C:\Users\Public\Alchemy Software\Catalyst 10.0
- All other Microsoft OS = C:\Documents and Settings\All Users\Alchemy Software\Catalyst 10.0
After you have created and saved the file it is necessary to restart Catalyst for the configuration to take effect. After reopening your project Catalyst will display the tag's attribute value below the string containing the tag, also known as the parent string.
Note that a child and parent string share the translation status. Thus if one is translated, both strings will be marked as translated.

This config.xml file can be downloaded and modified to suit your needs. It contains the following TAG;ATTRIBUTE pairs:
a;href
a;title
a;altMadCap:keyword;term
MadCap:keyword;MadCap:comment
MadCap:keyword;name
You don't have to delete the <item> line from the config.xml. You can expose the attribute's values for some of these tags by changing the option from “TRUE” to “FALSE”.
Showing attributes:
<item name="Show HTML Attribute" detail="MadCap:keyword;term" option="TRUE"/>
Not showing attributes:
<item name="Show HTML Attribute" detail="MadCap:keyword;term" option="FALSE"/>
Details on other configuration possible with the config.xml file can be found in our KnowledgeWell.
If you are developing a WPF project with Localisation in sight, this document is an overview of the steps to prepare your project for translation in Alchemy Catalyst.
Download our article on Catalyst WPF Overview: Catalyst WPF Overview
In addition to the articles included each quarter in this TechBytes Email, I will also include a white papers or case studies. Something you can get your teeth into if you have a bit more time. As we are increasing our library of white papers and case studies, I'd be happy to present on your behalf any topics that would make for a good technical reading.
Thanks for taking the time to read this instalment of TechBytes. It has been fun to write and I hope you found some if not all of it beneficial. We always welcome new article ideas, so if there is a feature you feel works really well and is worth mentioning, or indeed if clarification on a particular topic would help you, please let me know so together we can make TechBytes as useful as possible for everyone.
My best wishes
Cyril Vallin
![]()