

Hi all and welcome to the August release of the TechBytes newsletter.
Remember how, last quarter, I mentioned that it's not often very sunny in Ireland? Well what a change it has been this summer! "Finally!!" I said to myself bathing in the sun. Indeed we had fabulous sunny weather in July. Hot enough to compete with the continent ;-) And believe me this country is beautiful when it's sunny. It is a lovely place all the time, but particularly good when sunny :-) (I am a bit of a sun junkie). I hope you all got a chance to take a good break.
 So it's soon time to enter Autumn. Well of course it's not if you are based on the southern hemisphere! But in any case I thought following on from our very popular Coffee break videos. I could encourage you to view them with a free coffee on us! Complete the simple crossword for a chance to win a Starbucks card worth €25 to get your favorite hot beverage on your way to the office. Of course, reading the articles first will give you a strong advantage!
However, before you get stuck in with the competition, have a read of the articles I wrote this month on different features of Alchemy Catalyst 10. I have decided on those topics based on the feedback I received from all of you and inspired by tickets managed in Support.
As always, don't hesitate to let me know if there is any topic you would like covered in this TechBytes newsletter.
Cyril Vallin
Product Support Manager at Alchemy Software Development.
New Website
The web team have worked hard and the new Website is live: www.alchemysoftware.com
It's faster, better and full of information. Browse the site from your desktop, your tablet or your phone.
Now you can find all the support materials in one central location.
Access to the Support Centre area using your Support login.
The Swap Languages feature enables you to switch the source and target languages. This also means that the original text becomes the translated text while the translated text becomes the source.
Let me present 4 practical scenarios with which this ability to swap languages is key.
Correcting the TM
This first scenario evolves around the fact that you cannot modify the source text in a TTK. Well, not directly at least ;-)
Using Swap Languages, you make the source text the translatable text. You then make the necessary change and Swap languages back. At this point you may still be wondering what use this has?
It is particularly useful if you need to correct a TM (Translation Memory) so that 100% matches can be applied where only fuzzy matches were available. The perfect example would be a product name change. Take for instance numerous strings containing the word "CATALYST" which in the last version of the source files have been changed to "ALCHEMY". All those strings would be leveraged only as a fuzzy match because at least one word as changed. However, you know that it's only a product name change and that it doesn't affect anything else to the translation. Thus you can open your TTK (your TM), swap languages and modify/change all instances of "CATALYST" with "ALCHEMY". Once done, swap the languages back and save.
At this point, the leverage will apply 100% matches for all strings which have changed with the new product name.
The same principal can be applied to any changes which you know will not affect the translation. It is very useful if a typo has been fixed in the source files, or punctuation, or digits have changed and it affects a string, or paragraph for a project with multiple languages. You can imagine that small changes multiplied by a large amount of target languages can accumulate a substantial translation cost in fuzzy matches.
Intermediate language to final target language
When translating some source languages other than English, it may be difficult and at least more expensive to translate into other languages. Take for example a software developed in Finland which needs to be translated into Japanese, Chinese and Taiwanese. There won't be as many translators available to translate from Finnish to Japanese!
It can be cheaper to first translate the software in Catalyst into English, which then becomes the source language to translate into Japanese, Chinese and Taiwanese. The economy is of course greater the more target languages the project has.
Thus first the project is translated from Finnish (Finland) to English (United States). Once completed, the languages are swapped and the target language changed to Japanese (Japan). English is now the source text in the project.
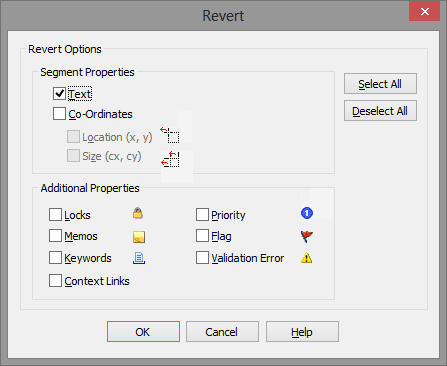
You will need to also revert the translations by Right mouse clicking on the Project title > Revert Object...
Only select the "Text" option as you probably don't want to remove the metadata. See below.
Translating Sub languages
In our third case, our project has a large panel of target languages. In the list, we have different flavours of a particular language, for example we have French (France), French (Canada) and French (Belgium).
In order to save on translation costs, we have decided the project should be translated from English (Ireland) to French (France) first. Then use the French (France) translations as the source to review and modify only the locale specific differences for the other 2 French languages.
After the French (France) translations are received and reviewed, the languages are Swapped in Catalyst and the target language is changed to French (Canada) or French (Belgium). As per the above case scenario, you will need to also revert the translations by Right mouse clicking on the Project title > Revert Object... only selecting the "Text" option so as to not remove the metadata.
As a result, you have a new TTK with French (France) as source which can be easily reviewed to only input differences in Locale French. This is cheaper than sending 3 TTKs to be translated separately by 3 locale French translators.
Updating the source files
Similar to correcting the TM, this scenario covers proofing the source files and generating what will become the updated source files. This process can be used to improve the quality of the text created by the development team.
The process consist of taking a source file and inserting it in Catalyst. The source and target languages can remain the same, for example we are translating from English (United States) to English (United States). English text is corrected (i.e. translated) where necessary. Ultimately you should translate and/or sign off all strings in the TTK. Once completed, the file is extracted from Catalyst and checked-in the source file repository, updating the developer's source file.
At this point we need to think about avoiding to have to review all the source strings again when the source file is next updated. Swap Languages in the signed off TTK so that the corrected/reviewed strings (i.e. the translations) now become the source strings. Revert all translations by Right mouse clicking on the Project title > Revert Object... only selecting the "Text" option so as to not remove the metadata. Sign off all strings again. We can sign off at this stage because we know all our translations were signed off.
When an updated source file is compiled by the development team, you can insert it in a new TTK project and leverage from the previous TTK. As a result, only the new and changed strings will not show as Signed Off, leaving you to review only the new and modified strings. Following the same process again.
Due to popular demand, in Catalyst 10, the engineering team have introduced the ability to customise colors in the interface.
You will find the file in which you can configure the color settings in your Public folder:
• Microsoft Windows Vista, 7 & 8 = C:\Users\Public\Alchemy Software\Catalyst 10.0\colours.txt
• All other Microsoft OS = C:\Documents and Settings\All Users\Alchemy Software\Catalyst 10.0\colours.txt
The contents of the file looks like the following:
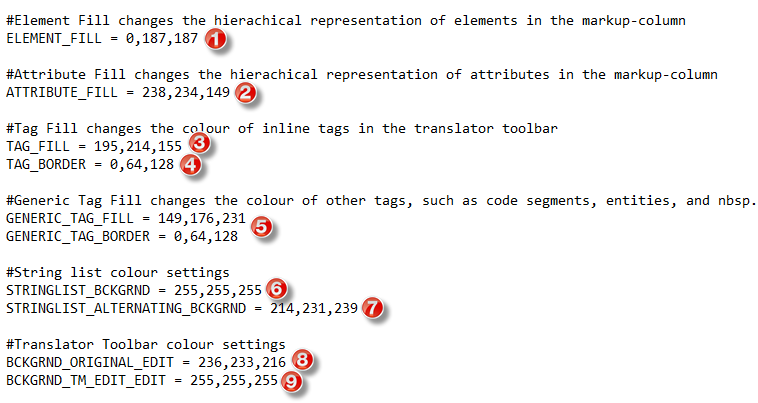
Each value is entered with the RGB color model (Red, Green, Blue). If you wish to make a change to any value, open the colors.txt file in any text editor and input the desire RGB values. It is necessary to restart Catalyst to see the new colors.
Using some colors only my young daughter would be very proud of, I will show you where each entry is reflected.
1 & 2
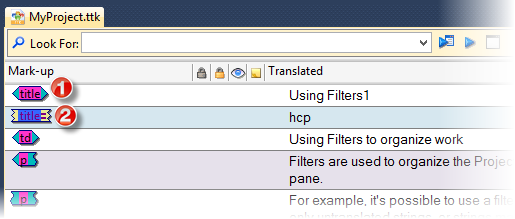
Control the color of the markup tag displayed in the Mark up in the string list. This affects HTML and XML files for which Catalyst displays those tags.
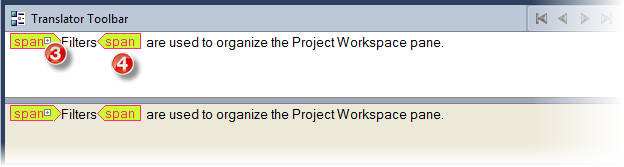
3 & 4
These entries change the fill and outline (including text) colors for the Inline tags displayed in the translator toolbar. This includes the tags at extremities which you see if you click the "Show/Hide Tags At Extremities" button in the translator toolbar.
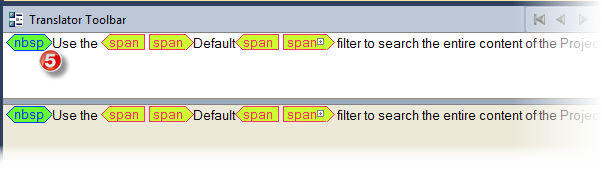
5
As per the above, those 2 values control the additional special tags colors. For example below, the NBSP (None Breaking Space) HTML tag.
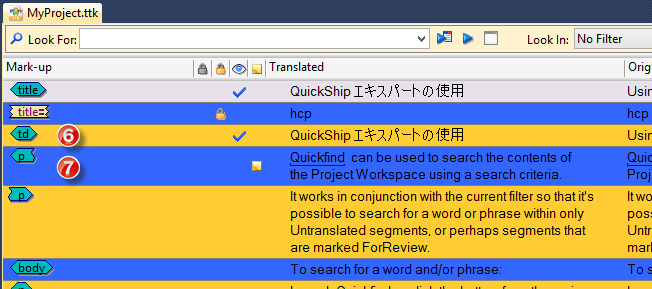
6 & 7
Probably the most important entries for most of you who have over time asked me if we can change the colors of the string list. It can finally be done in Catalyst 10 :-)
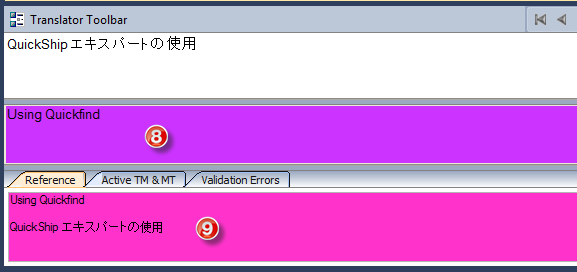
8 & 9
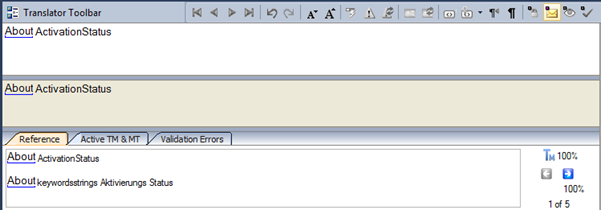
Finally, change the colors of the Source string field and the reference tab in the Translator Toolbar.
If you need to revert back to the original colors, you have 2 options. If you wish to reinstate all colors you may simply delete the colours.txt file from your Public folder and restart Catalyst. This will get the application to copy the original file back in as it detects the file missing. The second option is to open the original file which is kept in C:\Program Files (x86)\Alchemy Software\Catalyst 10.0\Public Files\colours.txt and copy the necessary colors RGB values.
With the release of Catalyst 9.0 was born the new Alchemy Translation Memory format: .tm. It nicely stands for Translation Memory. Unlike the .ttk (Translation Tool Kit) format which is bilingual, the TM format is multilingual. Using the Clean Up Expert, project TTK files can be consolidated into one multilingual TM very suitable as a reference file for future leverages/re-use of translations.
Let us explore the ins and outs of this file format.
The Alchemy Translation Memory (.tm) is used to centrally store multiple Catalyst TTKs in one single file. It contains all the information from the TTKs it was Cleaned Up from, including metadata and graphics. The contents of each TTK is stored into an individual language pair section within. It is a completely self-contained file. This has the advantage of making it easy to distribute throughout a translation team, via email and workflow systems: one TM file instead of multiple TTKs for each language supported.
At the core of the .tm the XLIFF format is used. It thus can potentially be migrated and shared with other translation memory solutions that also support this standard.
Consolidating your Project TTKs into one Alchemy TM file is best done at the end of a localization project milestone, or when ever you want to use the Scheduler (see February 2012 issue). It is not necessary to continuously Clean Up to TM every time you make an update to a TTK. The TM file is more suitable as a reference, a completed Translation Memory, for a given project or milestone. This is not to say you can add various projects to the same .tm file but my tidy organised mind would keep me to keep .tm files simple and organised :-)
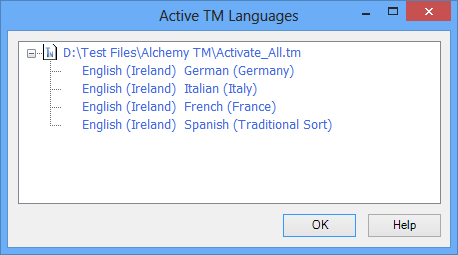
With the ability to store multilingual translations in one TM, it is necessary to check at any time which language pairs are contained within. There are 2 ways to see the TM content's information:
In the Translator Toolbar, after you have selected an Active TM (as .tm format), you can check the available language pairs included by clicking on the ![]() icon under the Active TM & MT tab.
icon under the Active TM & MT tab.

Catalyst will show you an information dialog, listing all available languages in the highlighted TM.
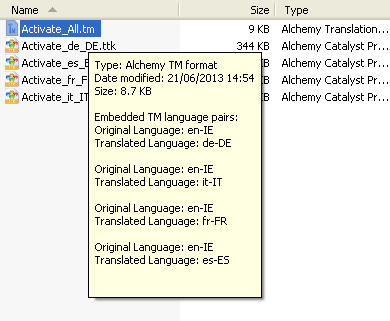
You can also get the list of language pairs included outside of Catalyst. In File Explorer, hover with your mouse over any Alchemy TM to see a summary popup with the contents listed.
Inside a .tm file
I have been asked how to view the contents of a .tm file. So let's explore!
There is no editor available to view and modify the contents of a .tm file. This is done within the TTK file before the translations are Cleaned Up to TM. You could however still modify translations in the Alchemy TM outside of Catalyst. Or at least view the contents.
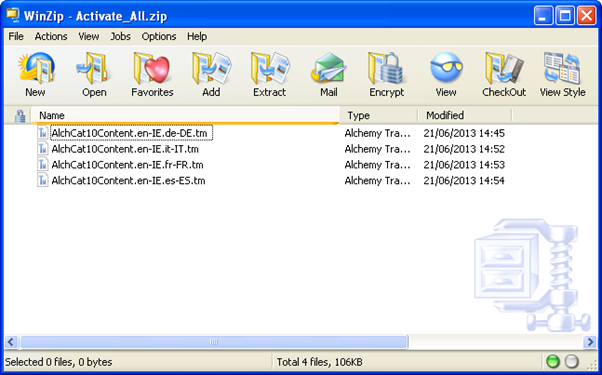
First rename the .tm extension to .zip.
Open the zip file to see the individual XLIFF based language pair files still in .tm format
Extract the TM file you want to review/modify and open it with any text editor in my case I used Notepad++.
IMPORTANT: All inline tags and keywords are stored as binary information in the TM and therefore can’t be modified outside of Catalyst.
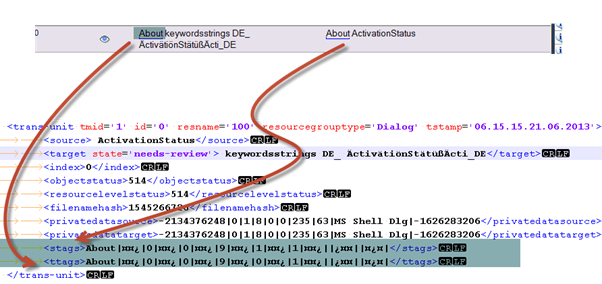
To adjust the translation in the .tm file just change the target string

When saving the modified TM insure the file name is not changed.
After saving your changes, add the modified TM to the zip file and then rename the .zip extension back to .tm.
Now when you attach the TM file as an active TM again, Catalyst will pick up the changes you made earlier.
Project Division lets you split large TTK projects into a number of smaller projects. Dividing a project into sub-projects enables multiple team members to work independently on the different sections. Providing you with a nifty mechanism to manage the translation (or engineering for that matter) of your files simultaneously.
The Project Division feature is found under File > Project Division.
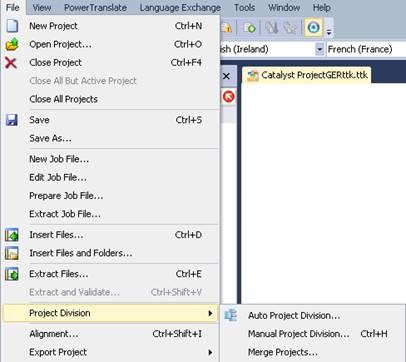
As you can see from the above screenshot Project Division offers you two methods of splitting projects along with the option to merge previously split projects.
Manual Project Division…
For those of you that have used Catalyst for a while now, the option was called “Export Section” in previous versions.
Select this option to see a tree structure of the current project’s contents.
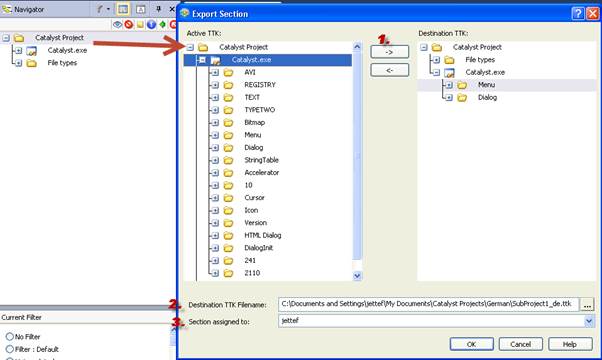
The list box on the left hand side in the “Manual Project Division” dialog will display the contents of your active Project TTK file. To divide your TTK:
- Select an item from the active Project TTK and click on the arrow “->” button to move it into the Destination TTK pane. You can select a group or individual items for export using the CTRL or SHIFT keys.
- Specify the name and location of your sub-project.
- You need to specify the name (or username) of the person you are exporting these items for.
If you have exported an item by mistake to the Destination TTK, just select the item in the Destination TTK and use the arrow “<-“ button to remove it.
After you have done your selection click OK and Catalyst will create one sub-project.
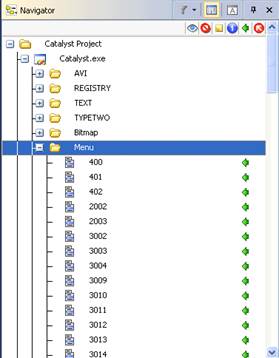
After the export of your items the Master Project TTK will display the Exported ![]() icon next to all exported items in the Navigator Window. To view the column, click the "Show/Hide Status columns" button at the top of the Navigator pane.
icon next to all exported items in the Navigator Window. To view the column, click the "Show/Hide Status columns" button at the top of the Navigator pane.
Note, you can potentially create several manual project divisions if you are careful to not select the same resource twice in the sub TTK projects you create ;-)
Auto Project Division

The Auto Project Division method lets you divide a Project TTK file into sub-projects based on the word count or desired number of sub-projects.
Selecting to divide into a certain number of sub-projects, the expert will divide the Project TTK file into sub-projects of approximately the same word count.
To control the segments that should be exported as sub-projects, use the translation status fields in the Export Filters.
![]()
You can either select one or multi-select several statuses for segments to be exported. For Review here means that all manually edited segments, Leveraged segments, Fuzzy Matched segments and Machine Translated Segments (i.e. any translated segment that is not yet Signed Off) will be exported into a sub-project once the filter is selected. Similarly, Signed off filter will include all strings with this status.
The Flagged Only option means that flagged segments will be exported whatever their translation status might be.
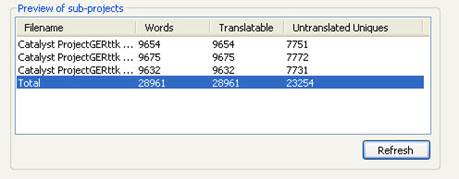
The Master Project frame displays a word summary of the main project TTK.
The dialog displays the total number of words, the translatable number of words – which excludes locked and frozen segments, and also displays the number of unique words yet to be translated.

To divide my Master Project into 3 sub-projects, I will specify 3 as the required number of sub-projects.

Pressing the Refresh button, will show the wordcount of the sub-projects in the preview area that would be generated based on the current settings.
Considering duplicates
If you opt to automatically divide projects with this feature, it is important to consider duplicate segments.
For example, if the Master Project contains three instances of the segment ‘Click here to continue’ to be translated. I am sure you'll agree the most efficient way to translate these duplicate segments is with all 3 instances existing in a single sub-project after division.
The linguist receiving that sub-project translates the first instance in the normal way and can use the 'Instantly Translate Duplicate' option to translate the other 2 instances. In this scenario, the first instance represents 4 new words, while the second and third instances represent 8 duplicated words.
If, however, on dividing the Master Project into three sub-projects, one instance of ‘Click here to continue’ ends up in each of the three sub-projects, the number of new words for the project actually increases to 12. For each linguist the instance of ‘Click here to continue’ will appear as a new segment, thus 4 new words for each sub-project.
The recommended practise is to optimize for duplicates by choosing to place duplicated segments into one sub-project before dividing the remainder into further sub-projects.
To do this, choose Create Duplicates sub-project option.
![]()
This takes the first instance of any segment that has a duplicate and places it into a Duplicates sub-project. By default, the actual duplicates, i.e. the second and subsequent instances of a duplicated segment are not exported – they remain in the master.
Once the Duplicates sub-project has been translated, the translations can be leveraged into the master thus translating all instances of the duplicates.
This option ensures that only unique segments are exported and no sub-projects contain the same segments. This is the most efficient way to deal with duplicates but it also requires the Leverage Expert.
If the Leverage Expert is not an option you can use the option to Include repetitions (subsequent instances of each duplicated segment). This will include all duplicate segments plus their repetition in one Duplicates sub-project. The first instance must be manually translated, but subsequent instances can be automatically translated using the 'Instantly Translate Duplicate' option or even Recycle Translation.
Merging TTKs
Once the sub-projects have been successfully translated you will need to merge them back into your Master Project TTK.
Selecting Tools > Project Division > Merge Projects launches the merge function and displays a File Open dialog allowing multiple sub-projects to be selected for merging with the currently open Master Project TTK.
It has been a year and half now since the first issue of TechBytes. It's time I started a little competition! :-)
Complete the puzzle below to find out the letters to form the Secret Word. Then Email the Secret Word to techbytes@alchemysoftware.com with the title "August competition".
We will draw a winner at the end of September 2013.
The winner will get a €25 Starbucks© card to spend on your favorite Coffee Break treats in your local store. I can't wait to find out who I will send it to. Get your pen & thinking cap on and let's play.
Across 3. Translation software by Alchemy Software 7. Apply translations automatically based on text and ID 8. Option to separate the translation load between translators (7,8) 9. City in which Alchemy Headquarters are located 10. This month TechBytes release Down 1. The Catalyst Expert used to create a .tm (5,2) 2. Full name for the Alchemy .tm file format (11,6) 4. Number of scenarios reviewed in the Swap Languages article 5. Option used to reset translations (6,6) 6. While the TTK format is bilingual, the TM format is _________ |
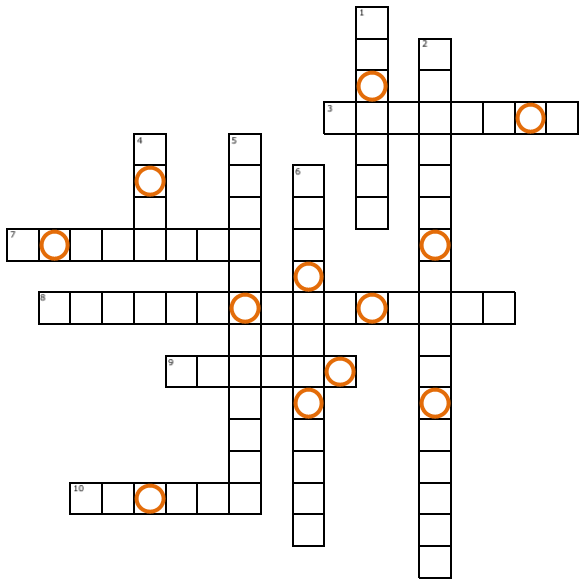 |
| Secret Word Hint: Divides paragraphs strings into sentences |
Thanks for taking the time to read this instalment of TechBytes. It has been fun to write and I hope you found some if not all of it beneficial. We always welcome new article ideas, so if there is a feature you feel works really well and is worth mentioning, or indeed if clarification on a particular topic would help you, please let me know so together we can make TechBytes as useful as possible for everyone.
My best wishes
Cyril Vallin
![]()