
Dear Alchemy Technology User,

My name is Cyril Vallin, I am the Product Support Manager at Alchemy Software Development and I’d like to welcome you to my new quarterly TechBytes Email. What I would like to do with TechBytes is to share the experiences that some of you are having so that we can all benefit and enhance our use of Alchemy technology. In Support we sometimes see similar topics being queried and I hope that sharing this knowledge will promote advancement amongst our users.
TechBytes will bring you a mixture of ezRead :-) articles on your hot topics as well as event updates and also some more detailed drill-downs into the product's code or white papers. I really encourage you to share your experience and skills by submitting articles, or article suggestions for this recurring Email.
Click on any of the screenshots to see it in full size.
News and updates
As part of the Localization World exhibition last Autumn in Silicon Valley, we released our Alchemy Coffee Break Videos. These short YouTube videos are a great way of introducing your team to Alchemy CATALYST in short snippets - Energize your localization process in just 10 minutes!
We would like to thank all of you who attended the Vancouver, Santa Clara and Dublin User Conferences in 2011. Keep an eye for our upcoming events in 2012.
Locking Keywords
Although first introduced in Catalyst 8.0, this essential feature has been extended in Catalyst 9.0 allowing the selection of Keywords directly in the translator toolbar and locking from the contextual menu.
Traditionally you can lock any string for translation within the String list of your Catalyst project. The string is still visible but cannot be translated/modified, it is marked with a lock pad icon. This can be a problem when only part of the string should remain untouched while the rest is to be translated. Using Keywords allows to lock part of a string leaving you to translate the rest. Locked Keywords are treated as an object or tag within the string and can only be left untouched or removed altogether but not edited/translated. Keywords are deducted from the wordcount. You can apply Keywords to resources selected in the project Navigator pane (always recursively) in 2 different ways: Lock Keywords from a keyword file (manually or on insertion) or Lock Keywords individually via the context menu.
When Keywords are applied, they display as underlined with a blue line:

Locking Keywords with Keyword file
Applying Keywords from a Keyword file is done either via Tools menu > Keywords > Lock Keywords... or CTRL+1.
This will prompt you to choose a Keyword file. By default, Catalyst points to C:\Users\Public\Alchemy Software\Catalyst 9.0\Keywords.txt (path from Windows 7) which has one predefined Keyword match. This match will lock any text surrounded by angular braces (< and >), this includes HTML and XML elements and FrameMaker tags.
A few more matches are present within the file but commented out. They are preceded by //. Simply remove those forward slashes to use the matches.
To review the existing matches and/or add your own Keyword matches, go to Tools menu > Options > Keyword File Settings > Edit... button. Alternatively open the Keyword file from Windows file explorer in any text editor. More details can be found within the file to guide you.
The important points to know when editing your Keyword matches are:
- Matches use Regular expressions
- Matches are Case sensitive
You will find more information on writing Keywords with samples in our Keywords Sample article in the Alchemy Knowledge base.
You can create as many Keyword files as you wish and use them appropriately on your various projects. There is no naming requirement as long as they are saved as .txt files.
Tip: You can apply Keywords several times to your projects. Thus applying different layers of Keywords using various Keyword files. However undoing Keywords will remove ALL Keywords. They are not differentiated from their Keyword file origin.
Once applied, Keywords are no longer editable but can however be removed. In order to safeguard the Keywords, the Validate Expert has a rule (Inconsistent Keyword check) to verify Keywords present in source are still in target. If the Keyword has been removed by accident from the translated string, it is possible to add it back in 3 ways:
- Copy & Paste the Keyword from the source string into the target string in translator toolbar.
- Right click in translator toolbar in the target string where you wish to restore the Keyword. Select "insert placeable" and select the missing Keyword.
- Click
in translator toolbar in the target string then click + Hold + Drag the Keyword from the source string into the target string.
If you need support with building a regular expression to Lock Keywords for your projects, contact support@alchemysoftware.com and we'll help you.
Locking Keywords on insertion
If you have a set of Keywords you want applied to all projects you work on, or possibly you are creating projects with ezScript, you can then opt to automatically apply Keywords on insertion. This means for every file you insert in a TTK project, the Keywords are systematically applied.
Go to Tools menu > Options > Keyword File Settings > Apply Keywords on Insertion
Note, the last Keyword file selected to lock Keywords manually becomes the default file in the Keyword File Settings.
Locking Keywords with context menu
With Catalyst 9.0, we have introduced an easier and faster way to apply Keywords. Select the word(s) in the translation field then right click > Lock/Unlock Keyword or Ctrl+Alt+K.
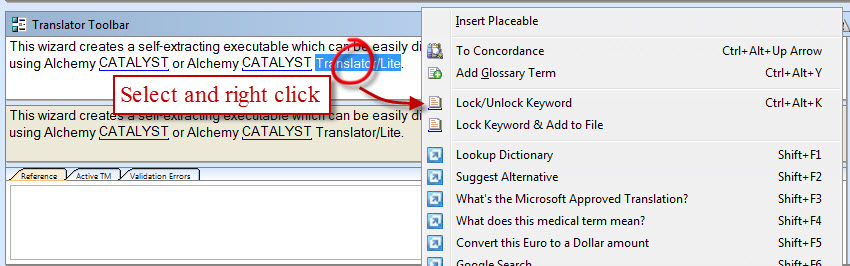
This will Keyword the selection in this string only. If you think there are other instances of this Keyword in your project, you can right click > Lock Keyword & Add to File. The Keyword will thus be added to the Keyword file currently defined in the Keyword File Settings. Any special character part of the Keyword will be escaped in the Keyword file, for example, locking (#) in string "Topic Id (#)" will create this entry in the Keyword file: \(#\)
The parentheses being special characters in regular expressions, they are escaped.
It is important the file you add to when Locking Keyword & adding to Keyword file is not opened, should be on local drive and is writeable (not set as Read only or in a user restricted directory).
Tip: You can review your project for any potential Keyword, use the Lock Keyword & Add to File for each first instance of the Keyword. Then apply the amended Keyword file to the entire project to apply all the selected Keywords from your review.
Removing Keywords
To remove Keywords on the selected resources in the Navigator pane (always recursively), go to Tools menu > Keywords > Unlock Keywords... or CTRL+2. All keywords will be removed. You can also remove individual keywords in the translator toolbar by right clicking on a keyword in Source or Target field > Lock/Unlock keyword.
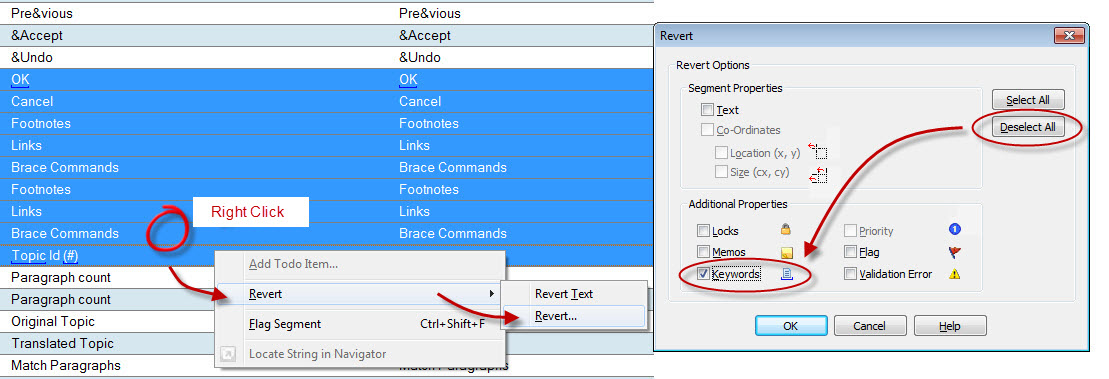
Tip: In some cases you may want to remove Keywords for a selection of strings but not all strings contained in a single resource. You can always multi select strings in the string list > Right click > Revert > Revert... In the Revert dialog which opens, click Deselect All button and then tick Keywords. This will result in removing Keywords for the selected strings only. This method also applies if you right click a resource in the Navigator Pane and select Revert Object...
Managing your custom ezParse rules
If working on text or XML based files, it is likely that you have written some parsing rules to handle your files. Although it is simple to build rules with Catalyst 9.0 parsing rule editor, making sure to you keep those rules safe is very important. Should the machine on which you had installed Catalyst 9.0 suffer from a hard drive permanent fault, your ezParse rules would be lost.
It is strongly advised to save your ezParse rules and back them up on separate Shared Drive or in a file repository.
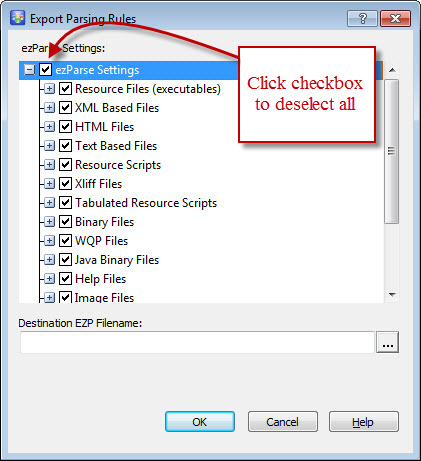
To save your ezParse rules, go to Tools menu > Options > ezParse > Export button
You have the option to select all or some specific rules. Saving your ezParse will generate an .ezp file which is an XML based file.
 |
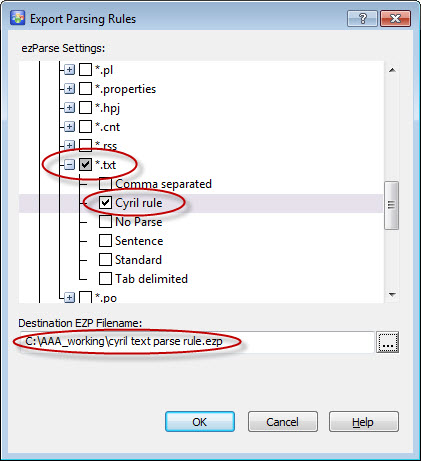 |
Tip: In order to save one particular rule, click on the ezParse Settings top checkbox. Then you can navigate to the desired rule(s) and select them individually. Finally name the file you are exporting to.
Having saved your ezParse rules, you now have the option to share them with other users within or outside of your organisation. You are protected in case of hardware failure requiring you to reinstall Catalyst 9.0 on a different machine.
To import ezParse rules Go to Tools menu > Options > ezParse > Import button. You will have the option to select all or some of the rules saved within the .ezp file in the same way you selected the rule to export.
The default parsing rules are always present on your machine in the User directory:
• Microsoft Vista & Windows 7 = C:\Users\Public\Alchemy Software\Catalyst 9.0\ezParseRules.ezp
• All other Microsoft OS = C:\Documents and Settings\All Users\Alchemy Software\Catalyst 9.0\ezParseRules.ezp
More on creating parsing rules in our Coffee Break Videos. Look at "Translating XML Files" and "Translating Text files" videos.
Saving Files
Autosave
Saving your file in Catalyst 9.0 is standard like all Windows application on the market, however there is more to know about what happens from creating a new project to hitting the Save button.
By default, there is an option to Autosave your project every 5 mins. It creates an .atk file in your public folder:
• Microsoft Vista & Windows 7 = C:\Users\Public\Alchemy Software\Catalyst 9.0\Autosave
• All other Microsoft OS = C:\Documents and Settings\All Users\Alchemy Software\Catalyst 9.0\Autosave
This can be configured in Tools menu > Options > Application. There you can change the time lapse to autosave on and the directory to autosave to.
The autosave will automatically save your "unsaved" project after the defined time lapse. This means, when you create a new project and start working on it without saving, it will automatically save after the defined time. This does not create a .ttk file but an .atk file. Once a project file is saved in the user interface, the autosaved version is discarded. There is no longer a need for this backup file.
In the event that the application closes prematurely leaving an *.atk file in the Autosave folder, on next launch of Catalyst 9.0 any .atk file is detected and you receive a notification:
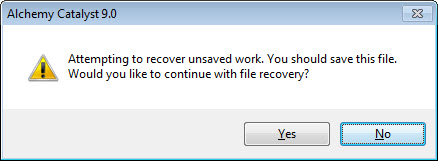
Note, closing without saving will clear the .atk file.
Tip: If you do not wish to be prompted by this message because you don't want to open the autosave files, go to the Autosave directory and delete any .atk file present.
Saving and backup files
When clicking on the Save button, or use File menu > Save, Catalyst 9.0 will create a .ttk file (Translation Toolkit Kit). This is the standard application format which can be shared with other user of the product. However, once you save the .ttk file subsequently, Catalyst 9.0 creates a .bak file which is a backup of the TTK reflecting the previous state of the TTK when you last saved.
Technically, the moment you click on Save, Catalyst 9.0 takes the current .ttk saved on your hard drive and renames it to .bak, then starts saving your project to what is ultimately a new .ttk file with the same filename.
Tip: In case something happens to your .ttk file, you can look for any existing .bak file in the same directory. You can rename this file from .bak to .ttk (for example, rename myproject1.bak to myproject.ttk) and open the TTK as normal. You have thus opened the last backup file which is the .ttk file saved before the very last time you clicked Save.
Scheduler & Job files
If you do not want to spend time writing ezScript commands but still like to automate different processes at a differed time, the Scheduler feature new to Catalyst 9.0 will be for you! The Scheduler in conjunction with a Job file is used in Catalyst 9.0 to run Alchemy Catalyst Experts as scheduled tasks. This will enable you to work across several target languages simultaneously. This can be easily set up through the UI of Catalyst 9.0 without any knowledge of ezScript commands.
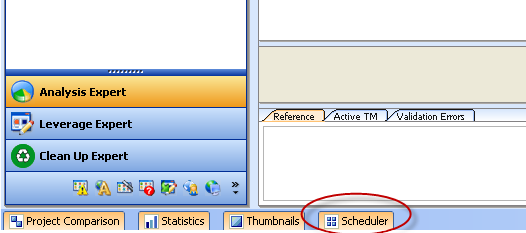
The Scheduler tab located at the bottom of the Interface is used to track the progress of Job files. Click on it to open and review the contents, just like you would with all other tabs in Catalyst. Use the thumb pin to lock or unlock it from view. This tab provides a real time progress status for each Job file that is being Scheduled & processed. From here you can start, pause and delete individual tasks.
Job files can now be used in Catalyst 9.0 Experts to send tasks to the scheduler. From there you can control when to run the defined tasks for all your project's languages. A Job file contains the following information:
- The Source Project TTKs – a Job file can contain several source Project TTKs
- Source and Target Languages – each Job file can have one source and several target languages defined.
- Target Folder – this is the output folder that will be used to store the outputs of each Job file submitted to the Scheduler.
How to create a new Job File
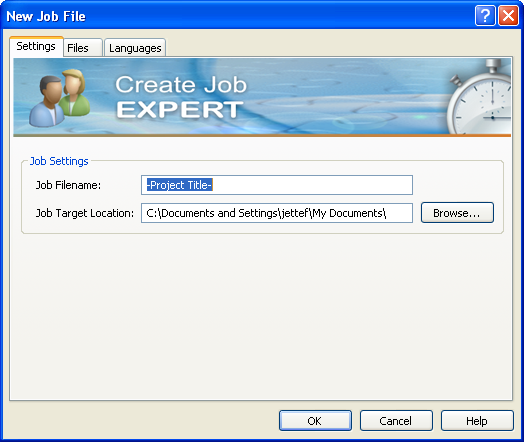
To create a new Job file click on File menu > New Job File…
In the “New Job File” window you can define the Job Filename; this is the filename your Job file will be saved as. For example, if you enter ProjectA as the job file, this will generate ProjectA.jobx in the Job target location.
The Job Target Location is the location used to store the Job File and also the location of all files which will be created as outputs when the Scheduler is processing this Job File.
Under the Files tab you will be able to add (or remove) the Source Project Files (TTK files). A source project file is the template TTK (or master TTK) for all the TTKs which will be automatically created (also called prepared) for the different target languages defined in this job file.
Tip: Create your master Project TTK including locking, Keywords and memos. Using the job file, you will automatically create (Prepare) a copy of this master TTK for each language defined in the Languages tab. Each of those TTKs will have their target language automatically changed.

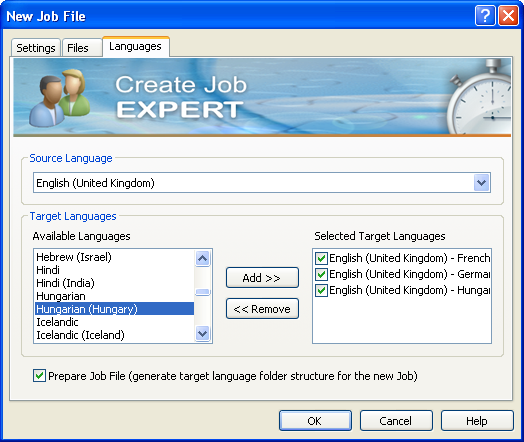
The Languages tab is to define your Source Language and all associated target Languages. Thus when using this job file in a Catalyst Expert, it will run the task for each language pair listed here.
When ticking the option Prepare Job File (generate target language folder structure for the new Job), on Clicking the OK button a folder will be created under the previously set Job Target Location. Catalyst will create a sub directory for each listed target language and copy the Source project files within, having changed the project's target language. Opting out of this option, you can generate the Target folder any time with File menu > Prepare Job File…
It is also possible to edit any job file, File menu > Edit job file...
Using your Job File
When launching one of the Catalyst 9.0 Experts you have the option to use a Job file. This will queue the task in the Scheduler waiting for you to start it at a suitable time. It thus allows to "Schedule" (in case you were wondering where the name comes from!) your tasks and run them at a time when you are not necessarily at your machine: going for lunch or leaving the office... In the example below the Leverage Expert is used with a Job file, a .jobx file created earlier.
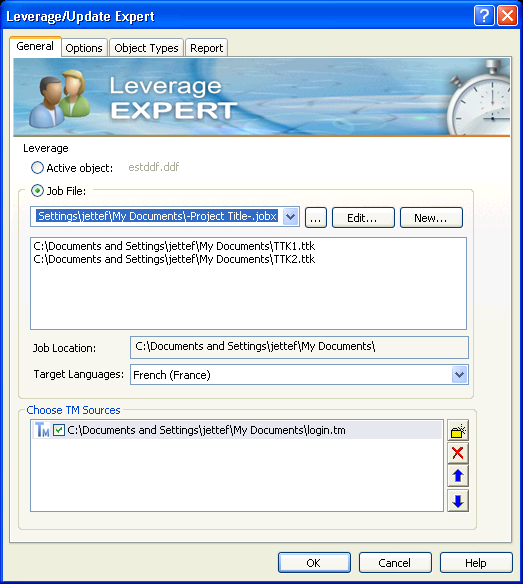
This is a very powerful mechanism for working with multi-lingual projects. For example, it is now possible to launch the Leverage Expert and run several leveraging processes simultaneously on your desktop.
If a Job file is used by an Catalyst Expert, it will be dispatched to the Scheduler. Opening the Scheduler tab at the bottom of the interface will show your tasks being queued:
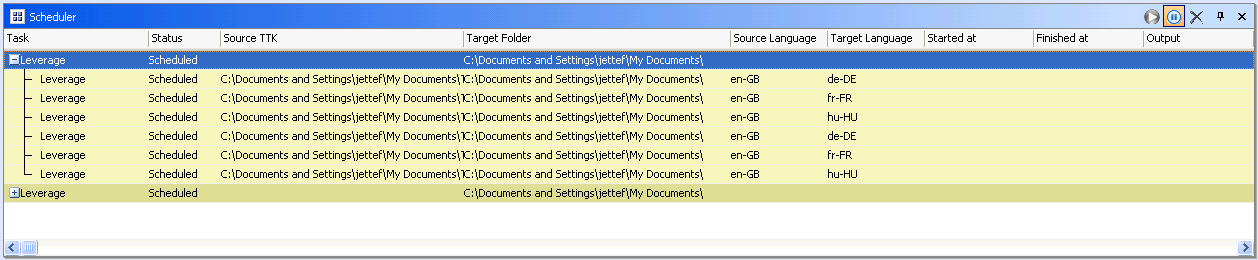
When a Job file is used to send to the Scheduler, it will be broken down into tasks. Those tasks are first paused. You can add as many tasks as you wish and run them when best suitable for you. This for example gives you the opportunity to run the tasks when you are not running other applications and processes which take resources available on your machine. To run a task you only need to press the play button in the top right of the Scheduler tab.
A Task is a discrete activity that is processed by the Scheduler. The number of tasks created is equal to the number of source Project TTKs multiplied by the number of target languages.
For example, if a Job File contains two source Project TTKs and two target languages, the Scheduler will create four tasks. When the Scheduler has finished processing a Task, its status will be set to finished.
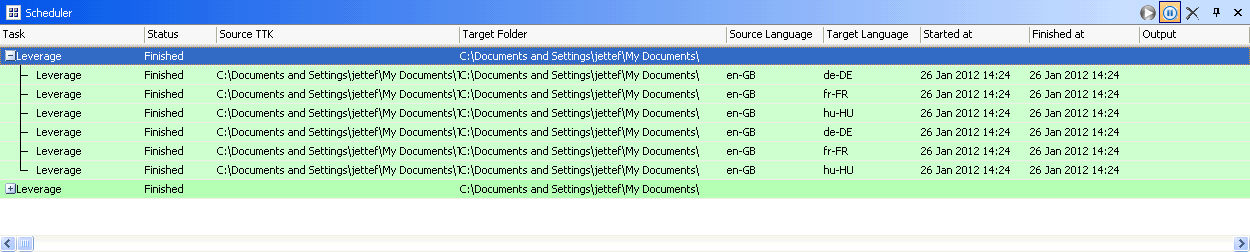
A completed task with all its sub tasks in the Scheduler, highlighted in green, can be deleted by clicking the delete button in the top right corner of the tab (X button).
Check out the "What's new in Alchemy CATALYST 9.0 - p. 2" video featuring the Scheduler & Job files in Alchemy Coffee Break Videos.
White Papers: Tips for creating a multilingual website
In addition to these articles each quarter, I will also include a white papers or case studies with TechBytes. Something you can get your teeth into if you have a bit more time. As we are increasing our library of white papers and case studies, I'd be happy to make suggestions on your behalf on topics that would make for a good technical reading.
Download our article on creating a multilingual website fully internationalized and ready for localization: Tips for creating a multilingual website.White Papers: Getting the most out of Visual View with .NET files
If you are developing .NET code destined to be localized then you will want to read this invaluable white paper on best practices to make the most of Visual View in Alchemy Catalyst.
Download our article on getting the most of Visual View with .NET files: Alchemy Catalyst .NET support
Conclusion
Thanks for taking the time to read this first instalment of TechBytes. It has been fun to write and I hope you found some or all of it beneficial. We always welcome new article ideas, so if there is a feature you feel works really well and is worth mentioning, or indeed if clarification on a particular topic would help you, please let me know so together we can make TechBytes as useful as possible for everyone.
My best wishes
Cyril Vallin
![]()