

My name is Cyril Vallin, I am the Product Support Manager at Alchemy Software Development. This TechBytes quarterly Email is to share the experiences from our users so that we can all benefit and enhance our use of Alchemy technology. In Support we sometimes see similar topics being queried and I hope that sharing this knowledge will promote advancement amongst our users.
TechBytes will bring you a mixture of ezRead :-) articles on your hot topics as well as event updates and also some more detailed drill-downs into the product's code or white papers. I really encourage you to share your experience and skills by submitting articles, or article suggestions for this recurring Email.
Follow us on Twitter
Adding to our YouTube channel, I'm happy to say we have just launced our twitter page giving you even more ways to keep up to date with developments. Click the Twitter button above to follow @AlchemySoftDev.Follow us on Twitter.
Halloween celebrations
Linked to the Irish festival of Samhain (Summer’s end), Halloween is a Celtic festival long celebrated in Ireland. Though in olden days turnips were used to create jack-o-lanterns, they have since been replaced with pumpkins which were more plentiful outside of Ireland (and let’s face it, a lot better to look at).
Pictures of Alchemy Software's Halloween celebration
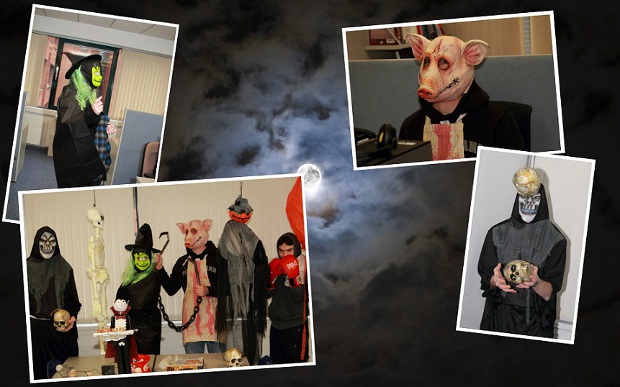
In the office that day, conspicuous by their absence, pumpkins and turnips were replaced by skulls and ghouls, by spirits and ghosts. Cinema was represented in the horrors that unfolded with Shrek and Rocky Balboa making cameo appearances. Though the lights of Rocky II’s time on the silver screen are long punched out, The Grim Reaper had spared his heavy soul till now. Such a formidable foe did he represent that Mr Reaper required time to raise assistance in reliving Rocky’s ruin. With Rocky I hanging from the rafters, The Butcher Boy and The Good Witch of the North (Dublin) were enlisted as the real purveyors of doom in Rocky II’s demise.
A lot of fun this was!
You may be using different fuzzy match bands for costing purpose. In Catalyst 10, you can now customize the Analysis Expert's fuzzy match bands to suit your needs. To achieve this, you will use a configuration file, config.xml, which should be edited in a text editor (such as Notepad++) and copied into the public folder:
• Microsoft Vista & Windows 7 = C:\Users\Public\Alchemy Software\Catalyst 10.0
• All other Microsoft OS = C:\Documents and Settings\All Users\Alchemy Software\Catalyst 10.0
You will need to restart Catalyst for the config.xml to take effect. A sample file can be downloaded here.
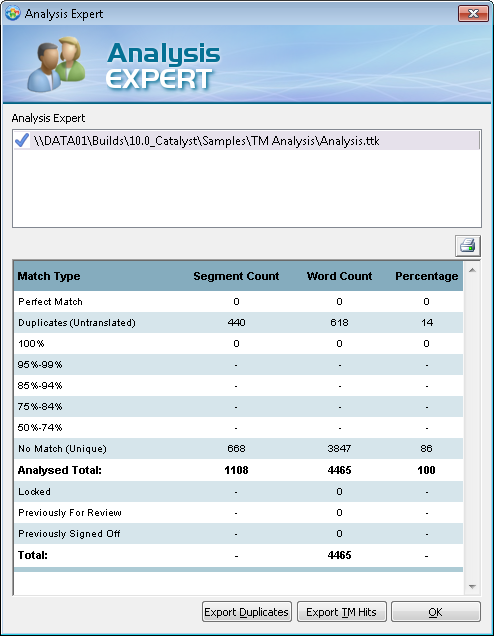
For each band, you only have to specify the lower limit, with the upper limit being automatically calculated. As an example, the following entries in the config.xml file would result in the default fuzzy bands of Catalyst 10:
Default settings <?xml version="1.0"?> <catalyst version = "10.00"> <task-control> <item name="Fuzzy Bracket" option="95"/> <item name="Fuzzy Bracket" option="85"/> <item name="Fuzzy Bracket" option="75"/> <item name="Fuzzy Bracket" option="50"/> </task-control> </catalyst> |
 |
Important points:
- The order these elements appear in the config.xml is not important.
- If no bands are present in the config.xml file, the default values are used.
- Any number of bands is possible.
- The highest band's upper limit is always 99%
Example 1 The following entries in the config.xml
would result in 2 fuzzy match bands: 70%-89%
|
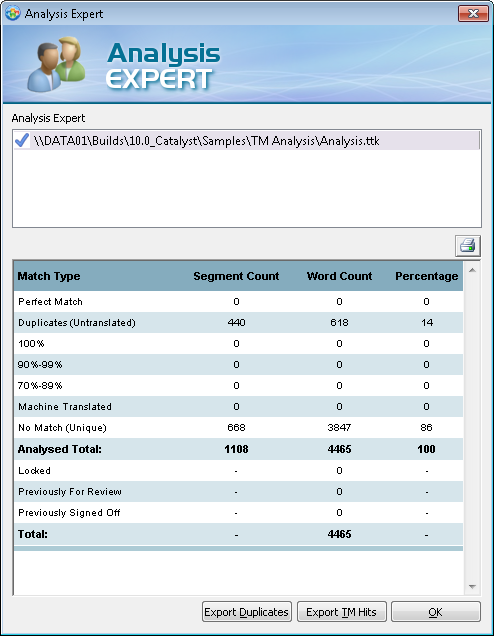 |
Example 2 By choosing bands of one unit, the analysis will report the number of words for a particular percentage. The following entries
would result in these bands 70%-89%
|
 |
The Term Harvest Expert is a new Expert in Catalyst 10 – let’s have a closer look at how it works!
The Expert is used to create a terminology database which is particularly useful if you do not already have one for your current or new projects. Catalyst 10 creates a terminology database by analysing and identifying terms from within your Alchemy projects.
Defining options for the Term Harvest
You will find the Expert under the Tools menu in Catalyst.
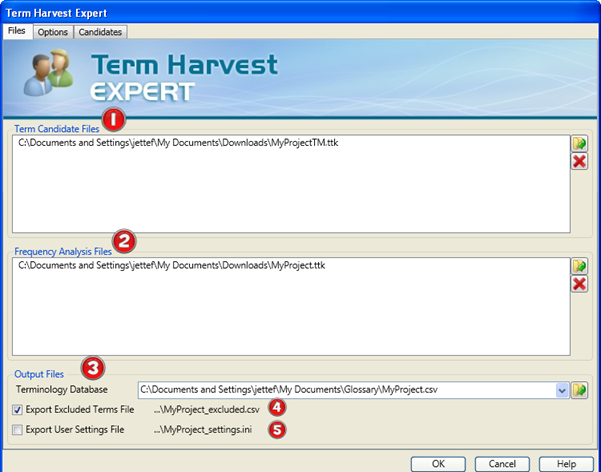
- Term Candidate Files - are TTK files that contain Terms e.g. previously translated files. Specifying an untranslated TTK will output Terms without translation, while specifying a translated Term Candidate file will output bilingual results.
- Frequency Analysis Files - The Expert starts with a complete list of segments from the Term Candidates files. It then searches these segments for sub-segments phrases based on the delimiters (customisable in the Options tab), thus increasing the pool of possible terms. With this increased set of candidates, the Term Harvest Expert then searches the frequency analysis files for uses of the candidates. Each use of a candidate increases the likelihood of it being a Term. Note: If you start a project without having any previous translated TTKs, you can select the same untranslated TTK that you used as your Term Candidate File.
- Output Files - are the generated terminology databases, which are saved in the open standard TBX or CSV file format.
- Excluded Terms File option will create a .csv file with all the Terms which are excluded as part of the Term Harvest. The word “_exclude” will be automatically appended to filename which is based on the name defined in point 3.
- Export User Settings File - select this option to store the settings used during the Candidate Analysis. Just like saving your profile in Catalyst, this generates an .ini file with the filename matching the Terminology Database filename in point 3.
Use the Options Tab to control what content types should be considered when analysing term candidates. User interface segments are typically rich in term candidates, however, all object types can be considered. You may include every object type and use the controls under the Candidates tab to accurately identify the terms.
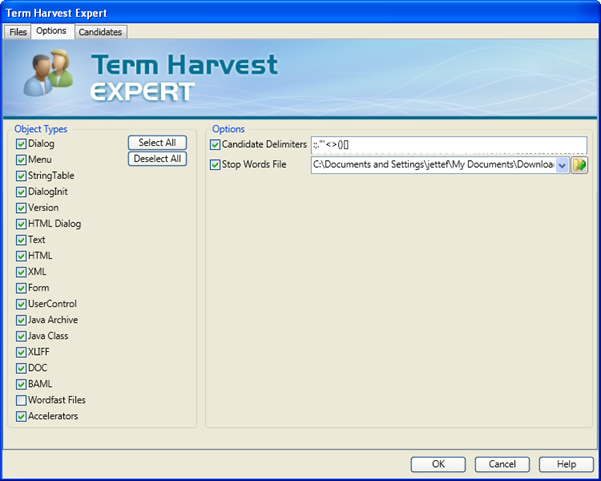
Using the Candidate Delimiters option, the Term Harvest Expert can look for the specified delimiters in full segments and highlight actual terms. This is a powerful option which allows the extraction of sections of strings as Terms, where they would otherwise be omitted.
For example, the above screenshot includes parentheses in the Candidate delimiters list. If you take the following string
“Please select your TM (Translation Memory)”
the Term Harvest Expert will present ‘Translation Memory’ as a term candidate. While without the option selected, ‘Translation Memory’ will not be presented as a term candidate and the entire string is likely to be excluded in the Candidate Analysis due to its length.
You can add and remove delimiters in order to maximise the pool of possible term candidates.
If you supply a Stop Words File, all listed words in the text file will not be considered as term candidates.
My example file below is very simple; it only consists of two words:
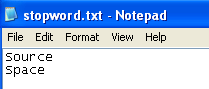
Before I applied the Stop Words file, Catalyst presented the following terms:
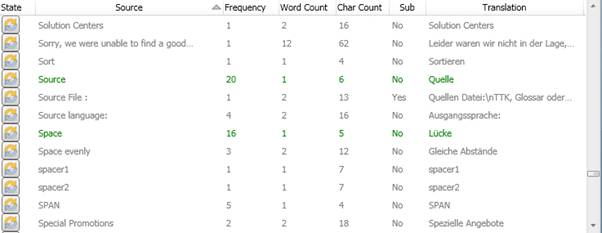
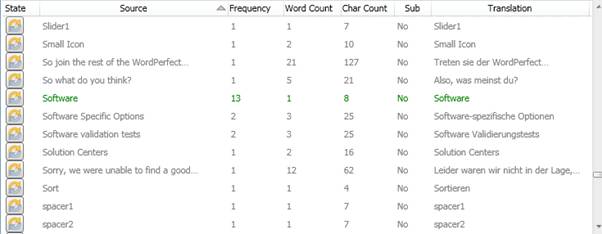
After I applied the Stop Words file, all term suggestions that contained the words space or source (as full words) are removed.
After you have picked your Object Types and checked your options, click on the Candidates Tab.
Analysing Candidates
Under the Candidates Tab you can view Catalyst's term suggestions and make further adjustments to accurately identify useful Terms.
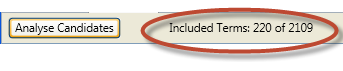
Catalyst will generate the term candidates list when you press the “Analyse Candidates” button (5). After Catalyst has calculated all possible term candidates, further options will come available to influence the selection process for term candidates.
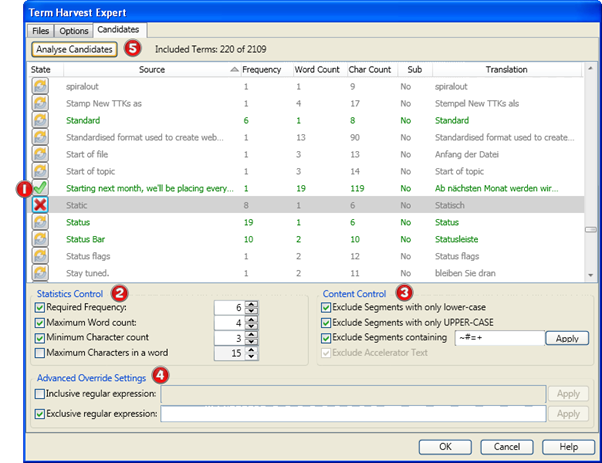
- The State Column indicates the status of the terms; each term candidate has three states:
 Automatic Status (default)
  Include
 Exclude
 By default terms are set to the Automatic status, meaning the Term's Include or Exclude status is governed by the statistics and content settings in section 2, 3 and 4. Terms listed in Green will be included and Terms listed in Grey will be excluded. Clicking the State button for each Term cycles through the statuses. Click once to set the status to Include
to force Catalyst to include the term. Click again to change the status to Exclude , which will force exclude the term. Click again and the status will be set to Automatic . - The Statistics Controls in this section relates to numerical qualities of term candidates. Each control can be enabled/disabled with the check-box to the left.
To control a term candidate’s inclusion based on the level of its use, enable the Required Frequency control. In the example below I have set the Required Frequency to 6, which means the term has to appear at least 6 times. If it is below the set threshold the term will be excluded and coloured grey in the list.
To control a term candidate’s inclusion based on the number of words in the term, enable the Maximum Word Count control. In our example, if a term has more than 4 words it will be excluded. The Maximum Word Count is useful for excluding candidates that are more likely to be sentences or phrases than terms. In a similar way, to exclude term candidates that are too short, enable the Minimum Character Count control. Useful for excluding very short words such as ‘in’, ‘on’, ’at’, ’the’, etc...
To exclude terms that contain very long words, enable the Maximum Characters in a Word control. When dealing with software user interface content, this option can be useful for excluding candidates that relate to the working of an application such as variable names (e.g. maximumSizeValue).
- The Content Controls relate to the content of term candidates.
Use the Exclude Segments with only lower-case to exclude segments that don’t appear to be terms due the lack of upper case letters. And use the Exclude Segments with only UPPER-CASE to remove those terms that contain all upper case letters. Valid terms are more likely to contain a mixture of upper and lower case letters (e.g. Leverage Expert). Although this is true with the English language it may be different for other source languages.
The Exclude Segments containing control facilitates excluding terms based on any specified characters. Characters such as =, +, ~ and # can exist in term candidates but are likely to mean it is not a valid term. You can extend this list as you like, after modifying the list just click the “Apply” button and unfit terms will be greyed out accordingly.
The Exclude Accelerator Text is used to ensure terms such as CTRL+A, CTRL+Shift+T are excluded automatically. The option is always on.
- The Advanced Override Settings area facilitates ultimate control by using regular expression to override Content Control settings in order to include or exclude term candidates as you see fit. You can use the regular expression to exclude phone numbers or Email addresses for example.
All these options have an immediate effect on the term candidates and the change can be seen right next to the “Analyse Candidates” button.
If you are happy with the selection of terms, hit the OK button to export the terms candidates into a .csv or .tbx file as previously selected in the Files Tab.
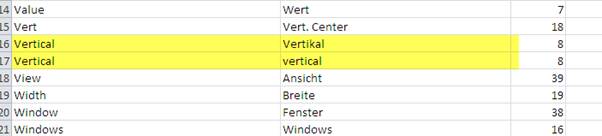
Catalyst outputs the translated field for each instance of the term so that you can edit the file if necessary. Furthermore, if the term appears more than once in the TTK with different translations, each instance of the source along with its translated segment is outputted, for example:
I find this feature is amazing in its simplicity and power in analysing, identifying and selecting Terms for your projects. The product's architects know how Term management is important to the quality of your projects across your organisation and this tool is the answer. I feel however the feature will need to allow to re-use performed analyses and build on it. You'll be probably as glad as I am to hear this is something which is already in the pipelines for the upcoming releases of the product.
I have always said that the Pseudo Translate Expert is one of my favourite feature of Alchemy Catalyst. There is a lot this tool can bring to the localisation engineer and this is something I wanted to discuss in this TechBytes article.
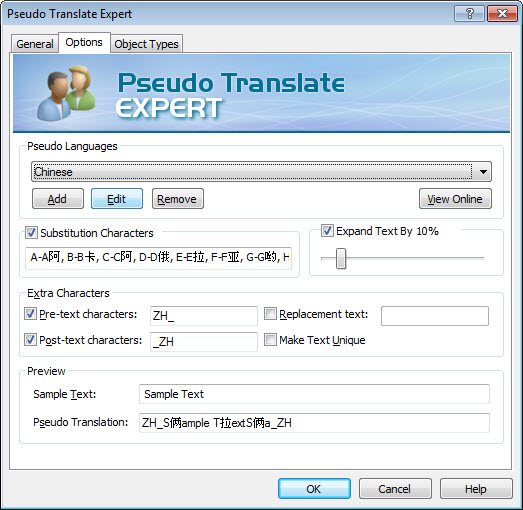
With Machine Translation becoming more and more sophisticated, many would say that it's a better means of testing translations. I would not agree as you cannot achieve the degree of control you get with the options available in the Pseudo Translate Expert. Indeed the feature gives you the ability to define the type of characters used, including of course double byte characters. Okay, you could say that this is exactly what a Machine Translation will achieve but as you can create your own character substitution list you can insure that ALL necessary problematic characters are used in your generated translations.
The control increases with the ability to define in percent the expansion length of the text. In the screenshot below for example, for Chinese translations the default expansion uses 10% while for notoriously longer German translations it is set to 20%. And this can of course be modified based on your experience working with your projects. Using the pre and post-text option you can insure that the interface will contain the necessary information for the test engineer to know exactly what they are looking at. For example if all the strings are preceded with JA_, the test engineer knows he or she is testing a product pseudo translated in Japanese.
Using the "Make text unique", the Pseudo Translate Expert will
append a unique number to each string in the TTK project. This is really useful when testing user interfaces as the test team can report a string being truncated referring to its unique number. Thus making it very easy for the localisation engineer to simply search for the unique ID and confidently change the correct string (and add for example a string size limit). Imagine if a "Cancel" button was truncated when there are 30 strings with that label in the project!! It would take a lot of trial and effort to identify the correct string the truncation affects.
I know your clever mind will find other uses for all those options in your Localisation cycle. For example, one customer found using only the post-text option invaluable to automatically translate any untranslated new strings (with a new version of the software files) and labelling them with a language specific tag. This because the software required that all new strings should be present (or risk a build failure) and a new localised file is required immediately in the build process.
So, having reviewed the options available to control the level with which you can apply Pseudo Translations, what are the applications which can really benefit the localisation process?
First, integrating one or more Pseudo Translated Language to your localisation build process will grant you tremendous savings in managing localisation bugs. Let's say that you are translating a project in 6 languages. You can add a seventh language, a pseudo translated language which will be your lead language in testing. At the start of your localisation project, you create TTKs to send for translation and allow a certain amount of time for those translations to be returned. Well with the pseudo translated language integrated in your build process, you can immediately create localised files and produce a localised build for the QA team to test. With this pro-active testing, localisation issues are found early and fixes implemented and communicated to the translators. More importantly, if it requires some code change by the development team, this can be flagged early. As you can imagine, this will result in far less localisation bugs found later in the other 6 languages.
The pseudo translation language becomes the most important language as it leads the way for all other languages in the project. Your localisation cycle can start with only the Pseudo Translated language(s) ahead of sending TTKs for translations for all other intended languages. Localisation (L10n) bugs are reported and fixed in the Pseudo translated TTKs. And these fixes can then be transferred into all the other TTKs to be sent for translation in the form of Locked strings, Keywords, Memos, string Max length and Context information.
But even before setting your project up to include a lead language to iron out localisation bugs, the Pseudo Translate Expert is key to any project localisability analysis. It is a worth while exercise to run any new project through a Localisability and Internationalisation review. You can identify all the files which will need to be localised and test that you will be able to successfully parse them in your tool of choice: Catalyst ;-)
Pseudo translating the files, you can test out each file and check for any internationalisation problem. You can also check for hardcoded string, meaning they are not resourced out in a localisable file but rather are left in software code. You don't always have the luxury of a test environment/build with which you can actually fully test your pseudo translated files, but nonetheless you will have performed a strong analysis of the file set and will be able to report to the development team on the tweaks and fixes needed to make the localisation of the project smoother, faster and thus cheaper! It could result in suggesting a different file format which can be parsed (with IDs), correcting hardcoded strings or even logging issues with unsuitable syntax for specific language or market.
Many of you are already integrating the Pseudo Translate Expert in your localisation process. But for those of you who haven't or are new to localisation I hope this is invaluable information. I have personally implemented the above processes with great success and yielded considerable savings for the projects.
The ability to revert some or all strings is a key feature when doing some Localisation Engineering work. I have often used the option while on a Web meeting and the attendees did not realise it was possible until they saw it. They were then delighted to see it is available.
In this article I would like to highlight the useful revert function to you.
Reverting is the ability to restore items in a Project TTK to their original pre-translated state. By Item I mean the translation (text) itself of course but not just that. It is possible to revert Co-ordinates and all the metadata associated to strings. As seen in the screenshot below.
You can opt to revert strings in two ways:
- Revert resources selected in the Navigation pane
- Revert one or several selected strings in the String list
Reverting from the Navigation pane
Right click an item, or the Project Title in the Navigator Window > Revert Object… (or go to Object menu > Revert Object…)
After choosing Revert Object… you will see the below dialog.
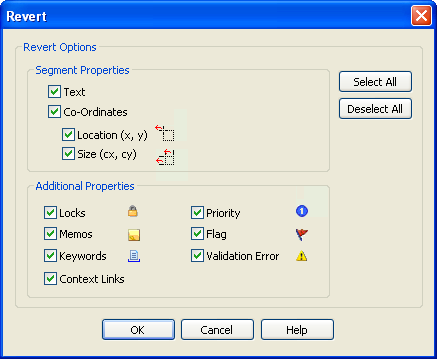
Here you can select/deselect which properties you would like to revert to their original pre-translated state before you click OK.
Text: Select this option to revert all text items back into their original untranslated state. This in essence reverts the translation.
Co-Ordinates: Select this option to revert all co-ordinate information back to their original state. This would be any resizing to dialogs for instance. Location and Size information such as Width and Height can also be individually selected.
Locks: Select this option to remove Locks from items in a Project TTK.
Memos: Select this option to remove Memos from items in a Project TTK.
Priority: Select this option to remove Priority status from items in a Project TTK.
Flag: Select this option to remove Flag status from items in a Project TTK.
Keywords: Select this option to permanently remove Keyword markups from a Project TTK.
After making your selection click OK and the revert Object command will restore your segments to their original source language.
Reverting from the string list
You can also access the revert function in the string list. This allows you to revert an individual or several strings. In the string list, you actually have 2 revert options: Revert text which will only revert the translation or text itself, while Revert... will open the Revert dialog as described above.
Below is an example of right clicking on a segment in a pseudo translated TTK and choosing Revert > Revert Text
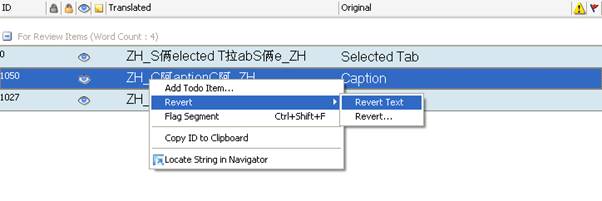
This is useful if you would like for example undo the last translation and restore the original source segment without having to enter a translation.
The ability to revert one string or the entire TTK in one click is very valuable when performing Localisation Engineering tasks. It may be that you need to add a new language to your project. Instead of creating a new TTK with all the source files, you could instead use one of your currently translated TTKs. This also means that you are creating a new TTK on the same level as your other translated TTKs. Make a copy of one of your Project TTKs, open it in Catalyst and highlight the top Project Folder in the Navigator Window. Right click > Revert Object…, select all the properties you would like to revert and click OK to revert your whole TTK to its original pre-translated status. It is most likely that you will only revert the text and coordinates for this task as you will want to maintain all the metadata (locks, memos, keywords, etc...). Finally change the target language to the desired new language and save your new TTK. You now have your language TTK ready for translation.
When troubleshooting a localisation crash bug for example, this feature is paramount in tracking a potential over translation. The most effective way to track a crash caused when translating files is to undo translations in half sections. So for example you revert half the translations in a file, extract and test. Did it fix the crash? If yes, you know the crash is caused by a string in the half you reverted. If not, it's in the other half. And you then keep halving each section until you narrow it down to the problematic string. So you can see how the ability to revert with one click is imperative.
This isn't to say that the above examples are the only applications to the Revert feature. I know that you will use it for many other reasons with this knowledge. For instance, you may have applied red flags on some strings to revisit translations. And now you want to remove them.
Some of you have asked about the differences between Translator/Lite and Translator/Pro editions. This recent feedback from one of our users comes to mind and I thought I would share it with you.
Download our article on the benefits of Translator/Pro as experienced by our customer: Adopting Translator/Pro
In addition to the articles included each quarter in this TechBytes Email, I will also include a white papers or case studies. Something you can get your teeth into if you have a bit more time. As we are increasing our library of white papers and case studies, I'd be happy to present on your behalf any topics that would make for a good technical reading.
Thanks for taking the time to read this instalment of TechBytes. It has been fun to write and I hope you found some if not all of it beneficial. We always welcome new article ideas, so if there is a feature you feel works really well and is worth mentioning, or indeed if clarification on a particular topic would help you, please let me know so together we can make TechBytes as useful as possible for everyone.
My best wishes
Cyril Vallin
![]()