

And so amidst the wet Irish autumn weather, the office at Alchemy Software is very busy with the development of Catalyst 11. The end of year always comes with deadlines for us all, but it's also a good time to reflect on the great work achieved and the improvements implemented.
Throughout the year, I deliver to you this TechBytes newsletter with in depth knowledge of the various facets of your favourite localisation tool Catalyst.
The TechBytes newsletters are all about learning about Catalyst and its Experts, discovering features you may not be familiar with, making the most of the tool and getting tips on maximizing your productivity. I personally select and compile the articles based on the most common or interesting questions from you our support customers.
All the released articles are available on our website, in the Support section. Use your Support Centre login to access all the past articles along with other resources available to our premium support members.
As always, don't hesitate to let me know if there is any topic you would like covered in this TechBytes newsletter.
Cyril Vallin
Product Support Manager at Alchemy Software Development.
Catalyst 10 SP4 released
The Service Pack 4 for Catalyst 10 was released this month. I would recommend you update your installation if you have not done so already.
Review the notification Email directly at this page: Catalyst 10 SP4 release
Halloween celebrations
For those of you who have been avidly reading the TechBytes newsletter for the last 2 years, you may have been expecting some pictures of this year's celebrations. It is with regrets that I have to disappoint as timing of Halloween this year meant I was not in the office at the time of celebration. And so I do not have pictures of myself looking very morbid in our office.
But that night, my children had a free for all with my face as a canvas!

For those of you celebrating Halloween, I hope you had a great time.
Adhering to Terminology in your translation projects is essential. Terms are words and phrases such as product names, specific interface labels, services, industry jargon, etc. And consistency in the translations for the term is of course paramount.
But how to build a glossary of terms if you don't already have one?
Term Harvest Expert, introduced in Catalyst 10, analyses and identifies terms within your existing translation projects, i.e. your .ttk project files.
Launch the Term Harvest Expert from the EXPERT ribbon

This dual option button either launches Term Harvest Expert or loads a previously saved Term Candidate list. This is a .termlist file.
Loading projects
Launching the Expert will open the following dialog
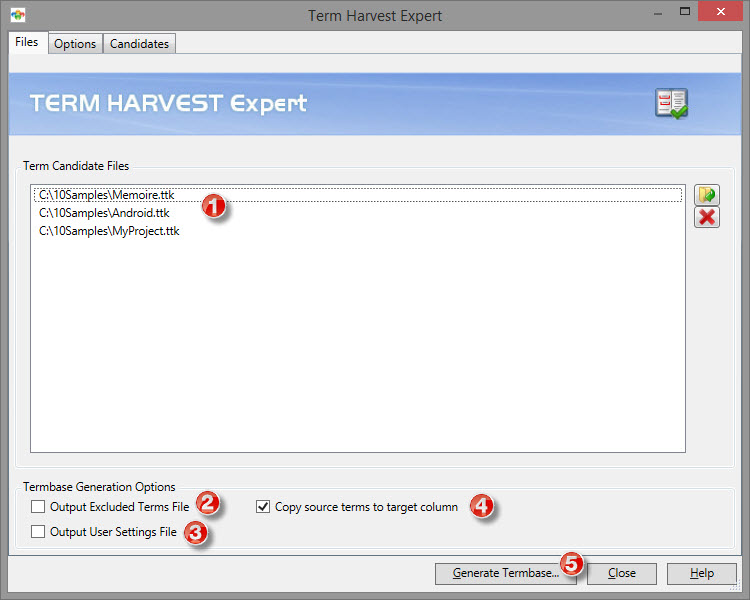
(1) Any project TTK can be loaded as Term Candidates files regardless of the target language. The translations found in the TTK are ignored for the purpose of collecting Term Candidates.
However, the target language found in the first TTK in this list will be the language used when creating a target column in option (4).
Selecting the output options (2) and (3) will create the respective files alongside the generated Termbase.
The Excluded Terms file will be named the same as the Termbase filename, appending _excluded to it. The User Settings File will be named the same as the Termbase filename but has the file extension .ini.
So for example, generating a TBX Termbase file with the name "Terms_ProjectA" and both options (2 & 3) selected will produce the following files in the target folder:
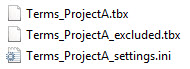
With the Copy source terms to target column (4) option selected, the above .tbx file will include new entries for the target language with the untranslated text.
This option is useful if you plan to translate the generated Termbase file. More details on this later in the "The round trip" section.
Setting options
Most of the options detailed in this tab are self-explanatory but let's review the key points to understand
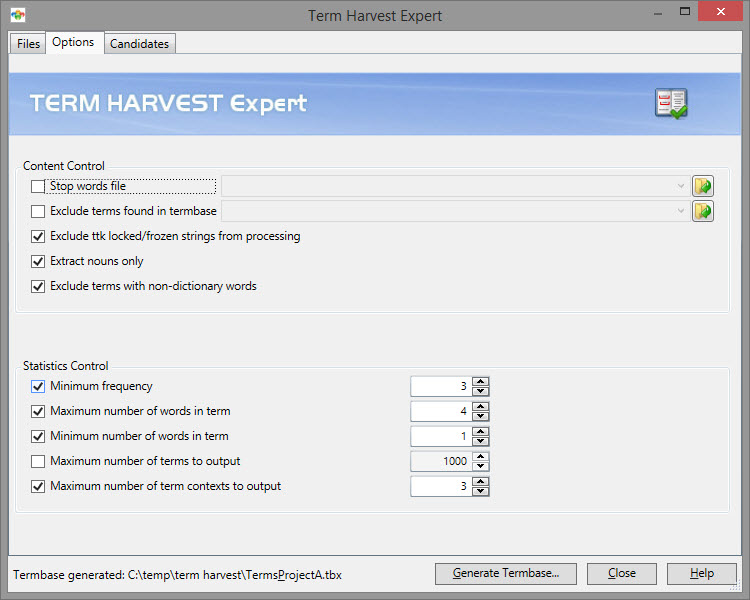
The upper part is all about excluding words/terms from the Candidate list which will be generated in the last tab: Candidates.
The Stop word file is a plain text based file with each word(s) to be excluded listed on separate lines. It is not case sensitive.
The option to Excluded terms found in termbase is used to point to any existing term file (.tbx, .cvs, .xlsx and .ods) to avoid creating duplicates. Any term found already in the file selected here will not feature in the Candidate list.
Exclude terms with non-dictionary words will reference an internal dictionary not related to the spellchecker dictionary. This internal dictionary is periodically updated by Alchemy. It is not accessible by the user.
The Statistics Control gives the user the ability to dictate what is to be treated as a term. Although the default settings will give good results, allowing it to be user controlled gives the needed flexibility.
With all the options reviewed and selected, it's on to the last step on the Candidates tab.
Selecting Candidates
You'll have noted by now that the Generate Termbase... button is available at any time. Ultimately, you could simply insert a project file in the Expert and click Generate Termbase... to create a Termbase file accepting all the default options. This makes more sense when you know the Expert remembers the last settings used.
With all the necessary options selected in the Files and Options tabs, the first thing to do in this last tab is Create candidates list...

(1) This button will allow you to save the current Candidates list to a .termlist file to work on at a later time. In the EXPERTS ribbon, one of the 2 options for Term Harvest is to open one of those files.
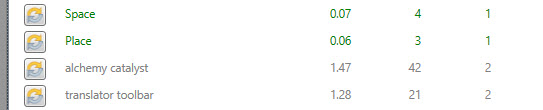
(2) This is the list of all the identified terms based on the selected settings. Each displayed with State, Score, Frequency (number of times the word is found in the project files) and wordcount.
This list can be further trimmed using the Advanced Override Settings (3). Changing any of those settings will require to click Create Candidates list button to refresh the list.
Excluded terms will still be in the list but greyed out. They will be listed after all the potential candidates in green.
With the list of candidates generated, all entries have the default state of Automatically included ![]() . Clicking on this icon will change the status to either Included
. Clicking on this icon will change the status to either Included ![]() or Excluded
or Excluded ![]() .
.
This means a greyed out candidate can be included by changing its state to ![]() and vice versa, a green candidate can be excluded by changing its state to
and vice versa, a green candidate can be excluded by changing its state to ![]() . The user has the last word!
. The user has the last word!
Furthermore, the candidate can also be edited by clicking on it. A cursor appears and the user can apply the necessary modification (change gender, case, plural, etc.)

For each candidate, clicking on it also displays the strings it was found in as Context.
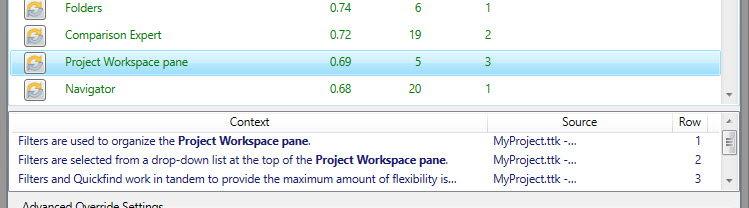
The amount of context listed is defined in the Options tab under Maximum number of term contexts to output.
Note, however, that only the first context string gets exported to the Termbase file, along with the associated source project.
The round trip
Term Harvest Expert gives the user the output options of
- Termbase Exchange (.tbx ) - Industry standard for terms
- Excel workbook (.xlsx)
- ODF spreadsheet (.ods)
- CSV (comma delimited) (.csv)
If you plan to translate the Termbase file, the option found on the first tab to Copy source terms to target column should be selected. With it, Catalyst will add an additional field/column to the Termbase as a place holder for the translation.
The .tbx format is best suited because a new parser has been added to Catalyst 11 to handle this particular .tbx output.
The parser is under XML based files with rulename "Term Harvest TBX".
| Standard .tbx output | .tbx output with Copy source terms to target column |
<termEntry> |
<termEntry> <langSet xml:lang="en-IE"> <descrip type="source"/> <tig> <term>Customize Toolbars</term> <descripGrp> <descrip type="context">Customize Toolbars...</descrip> <descripNote type="contextSource">MyProject.ttk - CATALYST.EXE\Menu</descripNote> </descripGrp> </tig> </langSet> <langSet xml:lang="ja-JP"> <descrip type="target"/> <tig> <term>Customize Toolbars</term> </tig> </langSet> </termEntry> |
Staying within the Catalyst Environment a user can:
- Generate a .tbx termbase
- Translate the termbase
- Consume the translated .tbx termbase by attaching in Term Sources
The Excel workbook format is good if you need to send the list to a reviewer who doesn't have access to Catalyst. It gives a simple and visual view of the Candidates list including the context information.

A request made by many of you has been to export the contents of the TTK to an XLIFF format. This XLIFF is then manipulated or translated in a different tool before getting imported back in the project TTK.
Translating Catalyst projects with the FREE Translator/Lite edition can be done provided the TTK is created in a Developer/Pro edition. The same applies with Exporting to XLIFF, allowing you to translate in any localisation tool which supports the format.
The XLIFF button found in Exports section of the HOME ribbon will be enabled for Developer/Pro users only.

Export to XLIFF
The XLIFF export is based on the 1.2 specification.
Regardless of the resource selected in the Navigation Window, the entire project will be exported. Each string will have all the information, known as Metadata, written to the XLIFF file. This includes:
- Translation
- Translation Status
- Lock
- Memos
- Inline tags
- Keywords
- Max Length
- Context path
The only information which isn't exported to XLIFF is the coordinates of Dialog or Form resources.
Important Note:
Resources set as Frozen in the Navigator window will get exported as locked (using the translate="no" attribute in xliff).
Also, if a resource is marked Frozen, importing from XLIFF will not import any data.
Import from XLIFF
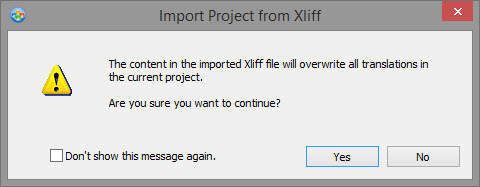
Importing will overwrite all the translation and metadata found in the project with the contents of the XLIFF (except for Frozen items as seen above). On importing, you will be prompted to remind you of this.
Click on the project title in the Navigator window and select HOME ribbon >Import from XLIFF
When importing, a file will be generated alongside the imported .xlf file. It is named: filename.xlf.import.xml
Even if no issue needs to be reported during the import, the file is generated (yet contains no data).
The following message is displayed when target differences or source mismatch are found.
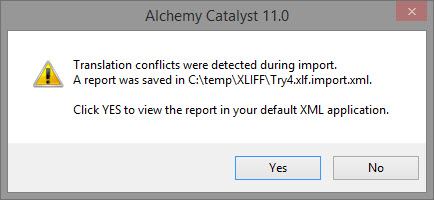
Regardless of the conflicts detected, the import will proceed.
The filename.xlf.import.xml file will then report 2 types of issues:
Target-difference - The translation present in the TTK is different to the one found in the XLIFF file. This can happen in 2 ways and means a translation already existed in the project when exporting:
- A translation has been edited in the TTK after exporting the XLIFF.
- The translation
in the XLIFF file has been updated.
Example Try4.xlf.import.xml:
<?xml version='1.0' encoding='UTF-16'?>
<import translation='C:\temp\XLIFF\Try1.xlf' ttk ='MyProject.ttk' source-language='en-IE' target-language ='ja-JP'>
<body>
<target-difference>
<trans-unit id='0' location='\Catalyst.exe\Menu\400~0'>
<ttk-target>View _translation_modified</ttk-target>
<import-target>View</import-target>
</trans-unit>
</target-difference>
</body>
</import>
Source-mismatch - The source string has been modified in the exported XLIFF. This case occurs when the source string in the XLIFF doesn’t match the source string in the TTK. Strings which don’t match by source (between TTK and XLIFF) are not imported.
<?xml version='1.0' encoding='UTF-16'?>
<import translation='C:\temp\XLIFF\Try1.xlf' ttk ='MyProject.ttk' source-language='en-IE' target-language ='ja-JP'>
<body>
<source-mismatch>
<trans-unit id='32882' location='\Catalyst.exe\Menu\400~32882'>
<ttk-source>&Navigator</ttk-source>
<import-source>&Navigator _source_modified_</import-source>
</trans-unit>
</source-mismatch>
</body>
</import>
Under the hood
You may find that recreating a TTK with the same files and importing from XLIFF gives you an error.
Let's review what happens under the hood to understand this better.
When creating a TTK, each file inserted as well as each resource (menu, dialog, etc.) gets a unique random numeric ID. Even if the TTK is created again with the same source files, new IDs will be generated.
When exported to XLIFF, each file resource is a group, and the group_id is assigned the resource ID generated in the TTK.
<group id='76588' resname='\Catalyst.exe\Menu\400' restype='Menu'>
<trans-unit id="1" resname="IDS_STR_03" >
<source>&File</source>
<target>&File</target>
</trans-unit>
When import from XLIFF, the match between the files/resources in the XLIFF and those in the TTK is done by this ID. Inside a group (file resource) the string by string match is done by string ID (resname attribute) and source string matching. The group ID is chosen as a match rather than the file/resource name because a file with same name could actually be a different file (.i.e after using Update Expert or the TTK is re-created from a different folder).
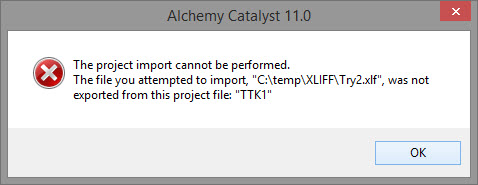
The message “the project import cannot be performed” appears when none of the group IDs (resource IDs) match between the TTK and XLIFF. And so no import is performed.
Adding a language to a .jar file with ezScript
JAR files are Java packages which are used to distribute files or applications to a Java platform. They can be multilingual including several sets of the same files for different languages.
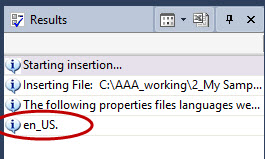
Inserting a .jar file in Catalyst and clicking on the file in the Navigator window will list out the languages included in the Results window. In this example, only the resources for the source language English (United States) are included:
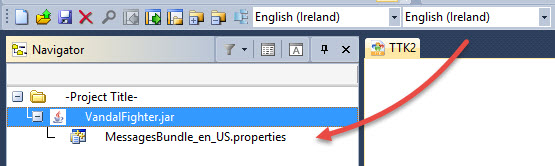
In the Navigator window, if your target language is set to any English, the localisable files (in this case a .properties file) will be listed.
and thus selecting any language which is not included in the .jar will result in no resources available for translation in the Navigator window.
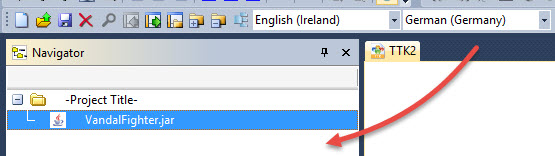
By now, you have guessed that you need to have the necessary languages already included in the .jar file to insert and translate in your Catalyst project.
However, it is indeed possible to Add a language to a .jar file inserted in a TTK project using ezScript.
Catalyst /MakeLang TTKName:FName Sourcelang:Lang_code Targetlang:Lang_Code [/open]
The command copies a .jar file's .properties files of one language to another, giving them the language file extension required. See Create a new Language in a JAR file in the ezScript online help.
So, let's take an example of a jar file which contains English (United States) properties files (with en_US appended to the filenames).
To translate into French (France), you need a copy of the English .properties files made in the .jar file. Changing the filename extension from en_US to fr_FR.
Using this ezScript command will result in both the original en_US and newly created fr_FR .properties files present in the .jar file.
C:\Program Files (x86)\Alchemy Software\Catalyst 10.0\Catalyst.exe /MakeLang ttkname:"C:\Test\My Jar Project.ttk" Sourcelang:"English (United States)" Targetlang:"French (France)"
It is important to understand the following using this ezScript command:
- Catalyst will look for any .properties file matching the Sourcelang language and make a copy using the Targetlang code only for those.
- If more than one .jar file is included in the TTK, Catalyst will apply the above point to all .jar files. If one .jar does not include any .properties matching the Sourcelang, then no Targetlang .properties will be created for that .jar file.
With the language added to the ttk, open the project in Catalyst and set the target language to French (France). This will confirm the .properties files are added correctly as you see them listed in the Navigator window.
Mutlilingual .jar files
You can add multiple target languages in the same TTK, changing the target language each time your need to translate or leverage from other bilingual Translation Memories (TTK, .tm, etc.). In fact, you can also change the target language using ezScript to switch language before leveraging. See Set target language in the ezScript Online help.
Once you have added languages to a .jar file in your TTK project, extracting the localized .jar file will produce an updated .jar file containing the original and all added languages.
The Leverage Expert has been updated in response to the feedback we have received from you, the Catalyst users. The following 3 enhancements were the most requested.
Let's review what they are and do.
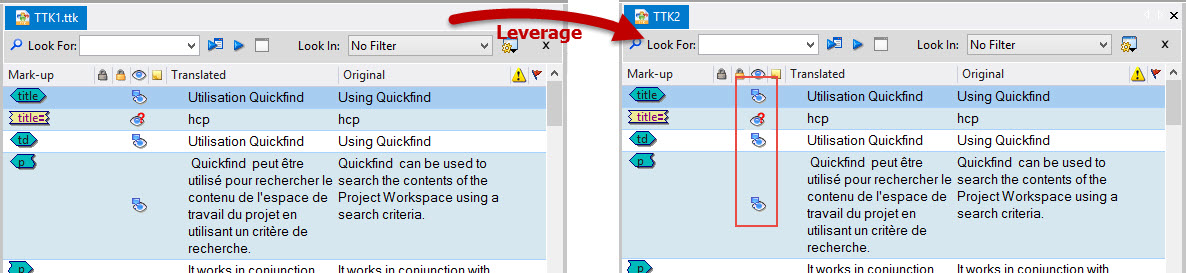
Persistent MT and Fuzzy Match status
If a string has a status of MT (Machine Translation) or Fuzzy Match in the translation memory, this status is maintained on leverage into a new TTK project. The status will only change when a user changes the status of the string to for Review or Signed off.
Catalyst 10
Catalyst 11
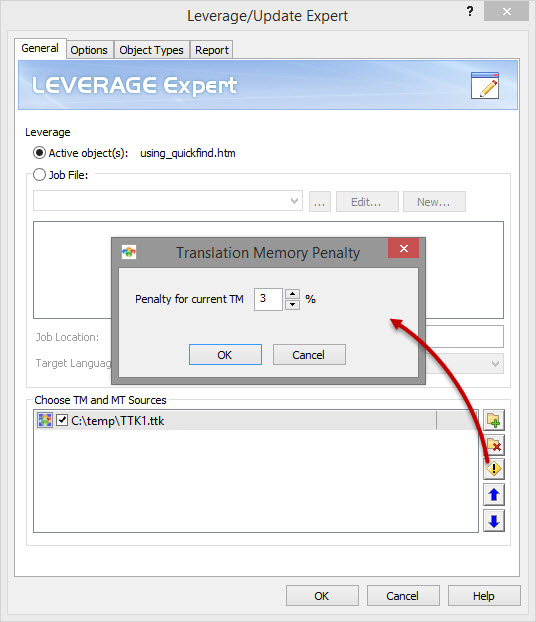
Apply penalty to TM
Set a percentage penalty to any of the Active Translation memories. This will result in 100% matches getting leveraged but marked as Fuzzy match based on the penalty set on the TM.
First set the desired penalty to the TM in the Leverage Expert

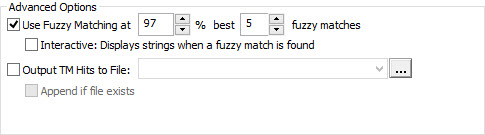
With a 3% penalty applied to TM, the Leverage Expert options should include Fuzzy Matches of at least 97%.
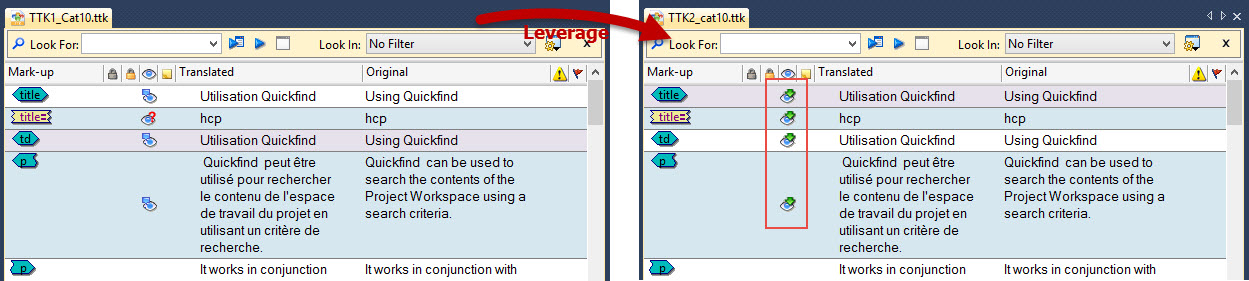
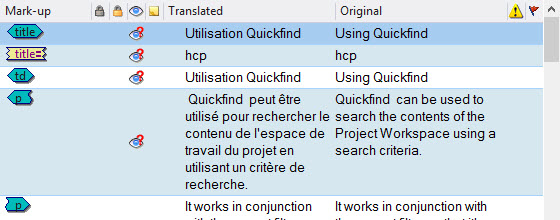
The leverage will result in the 100% matches leveraged as Fuzzy matches due to the penalty imposed
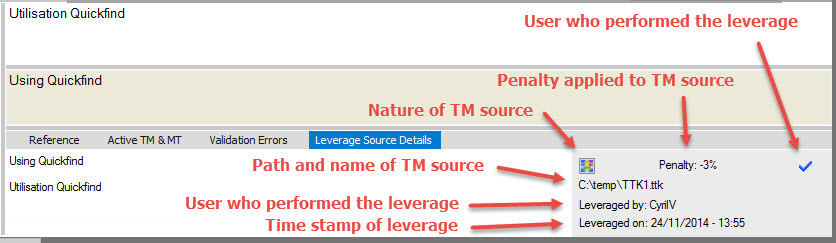
Leverage source details
All leveraged strings will now store information on the TM source and user who performed the leverage. It also will include the date and time of leverage.
With a string leveraged, review the details by clicking on the Leverage Source Details in the translator toolbar.
Thanks for taking the time to read this instalment of TechBytes. It has been fun to write and I hope you found some if not all of it beneficial. We always welcome new article ideas, so if there is a feature you feel works really well and is worth mentioning, or indeed if clarification on a particular topic would help you, please let me know so together we can make TechBytes as useful as possible for everyone.
My best wishes
Cyril Vallin
![]()