
Dear Alchemy Technology User,

My name is Cyril Vallin, I am the Product Support Manager at Alchemy Software Development. This TechBytes quarterly Email is to share the experiences from our users so that we can all benefit and enhance our use of Alchemy technology. In Support we sometimes see similar topics being queried and I hope that sharing this knowledge will promote advancement amongst our users.
TechBytes will bring you a mixture of ezRead :-) articles on your hot topics as well as event updates and also some more detailed drill-downs into the product's code or white papers. I really encourage you to share your experience and skills by submitting articles, or article suggestions for this recurring Email.
News and Updates
It's here! Catalyst 10 is released.
I am really excited with this release as it is packed with new and enhanced features.
Review the new features on our website: http://www.alchemysoftware.com/products/alchemy_catalyst.html > Click What's New tab.
 |
Alchemy Software Invites You to the London Localization Conference. Experience the latest features of CATALYST 10 |
Summer conference in Boston.
Please contact Shamus Dermody to register your interest.
Locking strings based on IDs
In my last TechBytes Email (February issue), we explored in depth how to lock Keywords within your TTKs. Now with the release of Catalyst 10 we have extended the way in which you can lock strings from a Keyword file. And this is made easy with the addition of another feature: Copy ID to clipboard.
This has triggered an idea for a process which I wanted to share with you all. Indeed this new Copy ID to clipboard option in the string list allows us to be inovative and extend the way in which we can lock strings based on their ID. Here is an example of the steps you can take to lock strings by ID on inserting your files with ezScript:
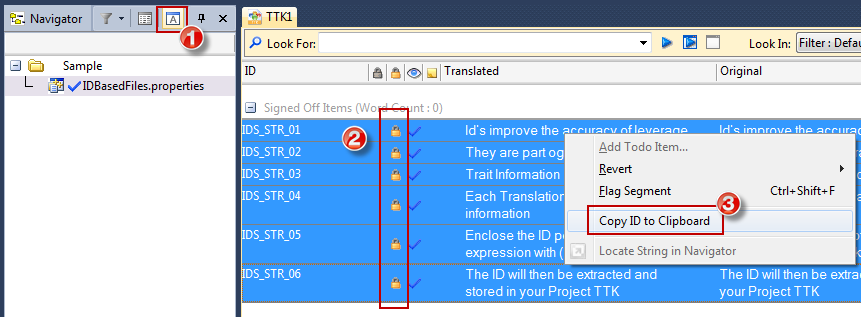
1. Invoke the option to Show All Strings on the opened TTK.
2. Highlight all the Locked Strings. The column can be sorted to bring all the Locks to the top.
3. Right click on the strings and select Copy ID to Clipboard.
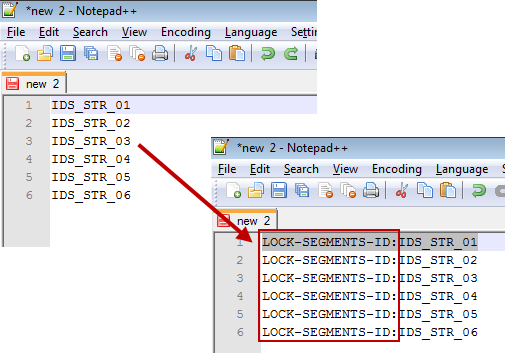
4. Paste these into a Text file. I used Notepad++ which allows to replace using regular expressions.
5. This file will be used when applying keywords so each line in the file needs to be preceded by LOCK-SEGMENTS-ID:
6. Do this via regular expression - Find: ^ (meaning start of line in regular expression) and replace with LOCK-SEGMENTS-ID:
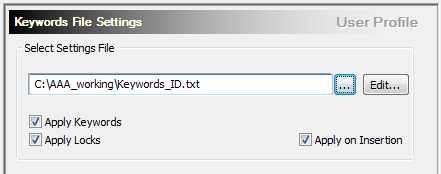
7. Save this file. It will be used as a Keywords file. In this example, I saved as Keywords_ID.txt.
8. Now we need to make sure that the Apply Keywords on Insertion option is checked in Catalyst: Tools > Options > Locks & Keyword Files Settings
9. Save out a user profile – Tools > Options > User Profile > Save – with just the Keywords Settings Enabled
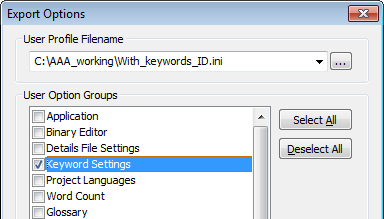
10. Now during the TTK creation stage of the ezScript process, before making a TTK make sure to load the User Profile, like so:
"%CatalystEXE%" /C "%INIFilePath%\With_keywords_ID.ini" /load
11. The path to the Keywords has been set in the .ini file (in this example With_keywords_ID.ini) and you can see in the file ezScriptBatchLog.txt all the locks which have been applied into the TTK.
I hope this article will fuel your processes and automations with new options!
Using regular expressions in the Keyword file, you will be able to lock strings based on the presence of a name/word/number in the ID.
Adding Rich Context Information to your TTK projects
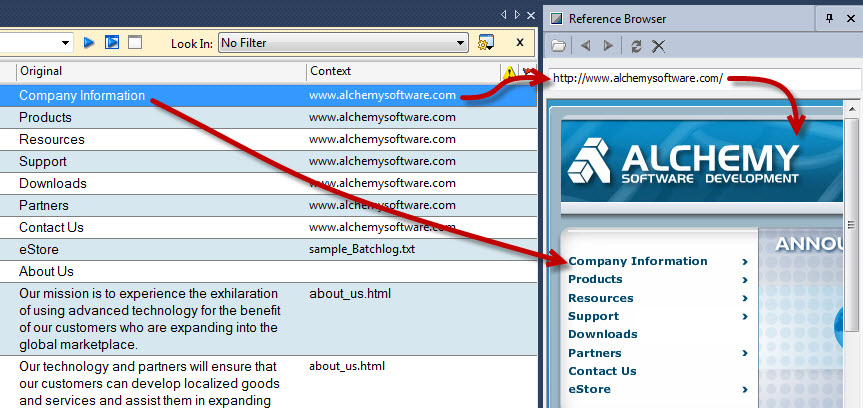
With the latest release of Catalyst 10, you are now empowered to add context information to each individual string in your TTK projects. With the use of the new Reference Browser tab, you can reference any hosted information which will be rendered using IE. This can be a web site page, a hosted picture, an image on your local network or even a PDF document.
Your translator can review the rich in context information you supplied in the form of an image, a webpage or a text based document, any format your browser can read!
Context information at it's best!
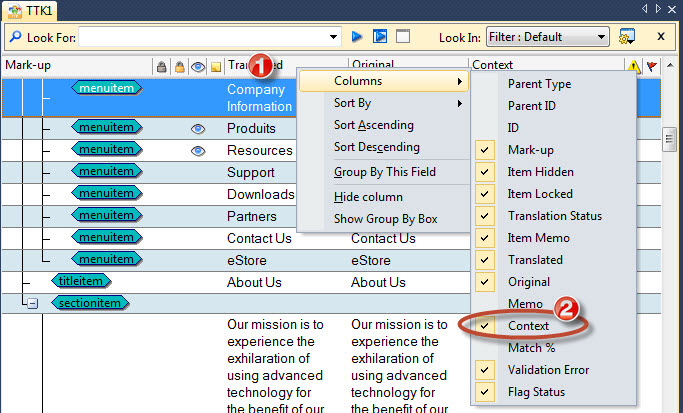
So you'll now find a new column available in the String list: Context. Right click on the column header in the String list (1) and select Columns > Context (2).
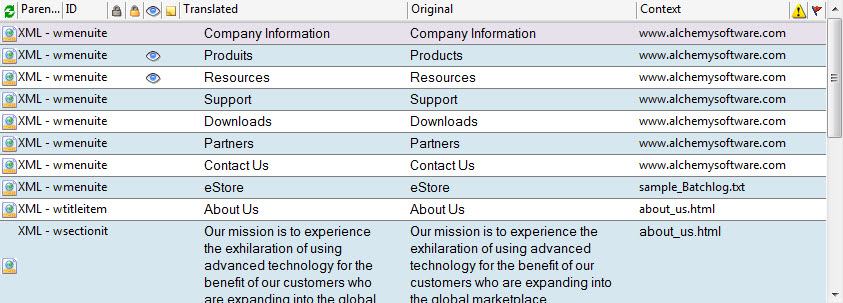
With this column turn on, translators can view the context path supplied for each string. For example:
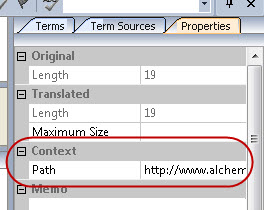
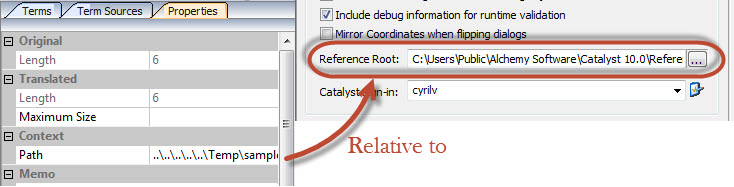
The context path is entered in the Properties tab, in the Context / Path field.
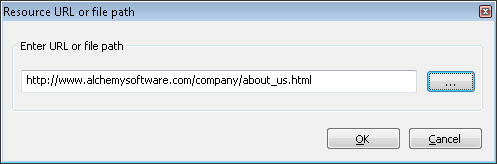
Clicking the Path area will bring up the dialog in which you can enter (or paste) a URL or locate a file with the browse button (...):
When selecting a file path, you will see the path converted in the properties tab. It is relative to the Reference Root defined in Tools menu > Options > Application. If the absolute reference path is not found, Catalyst looks into the Reference Root directory. This makes it easy to pass on all reference files to your translator instructing them to copy into the Reference Root directory, or alternatively changing the Reference Root path.
Regardless of having the Context column visible in the String list, a translator can invoke the Context information in 2 ways.
![]() Clicking on Automate context links in Reference Browser (F10) toggle type button in the translator toolbar, for every time you click on string with context information, the Reference browser will open shortly displaying the defined reference.
Clicking on Automate context links in Reference Browser (F10) toggle type button in the translator toolbar, for every time you click on string with context information, the Reference browser will open shortly displaying the defined reference.
![]() Clicking the Refresh context links in Reference Browser (F11) while translating will automatically open the Reference Browser displaying the defined reference. If there is no reference defined for the current string, nothing will happen.
Clicking the Refresh context links in Reference Browser (F11) while translating will automatically open the Reference Browser displaying the defined reference. If there is no reference defined for the current string, nothing will happen.
Hint: If you pin the Reference Browser tab to display all the reference Web pages, Images or files, you should press Automate context links in Reference Browser button on to ensure the context is refresh for each string you work on. Without this button on, the context will not be refreshed.
Anchors in URLs
The context path can support anchors in your URLs. For example I could point to a particular article in last TechBytes using the following format, the anchor is in bold:
http://www.alchemysoftware.com/support/techbytes/techbytes_web_feb12_sgt4576.html#lockingkeywords
And it gets even more powerful when you consider you can do the same with a PDF file!
Using the Macromedia reference document as an example (http://www.adobe.com/content/dam/Adobe/en/devnet/acrobat/pdfs/pdf_open_parameters.pdf) you have the ability to open a PDF document at a particular page and with a particular zoom level. There are more options but I'll focus on those 2 most useful examples.
To show page 6 in the above PDF file, you should enter the following in the context path:
http://www.adobe.com/content/dam/Adobe/en/devnet/acrobat/pdfs/pdf_open_parameters.pdf#page=6
To show the same page with a zoom level at 100%, you should enter the following in the context path:
http://www.adobe.com/content/dam/Adobe/en/devnet/acrobat/pdfs/pdf_open_parameters.pdf#page=6&zoom=100
If this is too big to maximize the contextual information, you could reduce the zoom level to 75% with this context path:
http://www.adobe.com/content/dam/Adobe/en/devnet/acrobat/pdfs/pdf_open_parameters.pdf#page=6&zoom=75
Finally, if the PDF opens the bookmark pane opened by default, you can remove it and open page 7 with the following context path:
http://www.adobe.com/content/dam/Adobe/en/devnet/acrobat/pdfs/pdf_open_parameters.pdf#pagemode=none&page=7
Try it!
All this is bound to give you the power to give the best context information for your translators. I hope this will trigger some great new ideas on enhancing your TTK projects with invaluable Context Information.
User Defined Validation Tests
I am very excited to introduce the new User Defined Validation tests! The Validation Expert has always been key in translating with Catalyst, saving countless localisation bugs with validating the translations. However there were still many checks our customers wanted to perform which were not in the Expert' set of tests.
Now you can use exact text strings and particularly regular expression syntax to identify Consistent patterns between source and target, Correct translations or Invalid terms. This is my favourite enhancement with Catalyst 10, it really brings the Validation Expert to a whole new level. Validation has just got awesome :-)
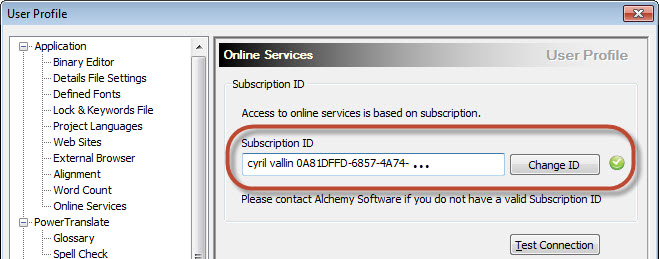
Along with the tests your can define yourself, as an Alchemy customer with Support you have access to the Online Validation Test Repository. If you have a Technical Support contract, your license file will include a subscription ID which will enable you to view and submit Validation tests, Pseudo translation settings and ezParse rules. You can review this subscription ID in Tools menu >Options > Online services, for example:
Building a user defined validation test
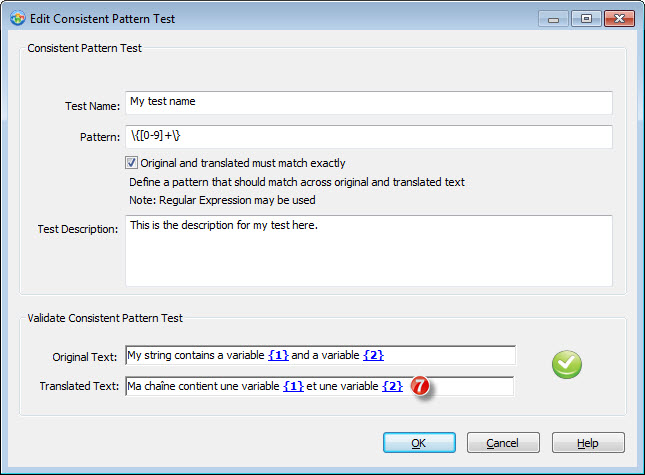
Let's create a sample test to demonstrate the new user defined validation tests (note that this test is already available online). A test which checks that variables of type {1} are present in the translation. For this check, we should use the Consistent pattern test.
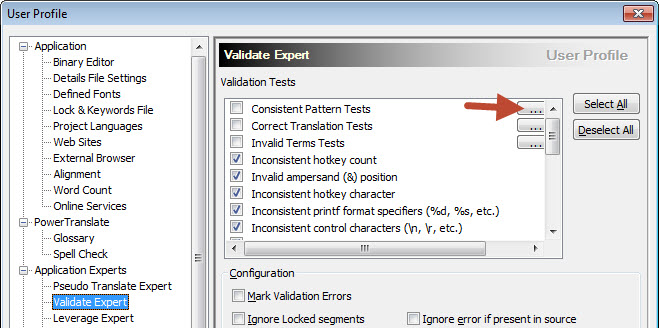
Go to Tools menu > Options > Validation Expert.
There you will see 3 new Validation tests to the list you knew from previous versions of Catalyst 10. Each with a browse button because they are test groups which can include several tests.
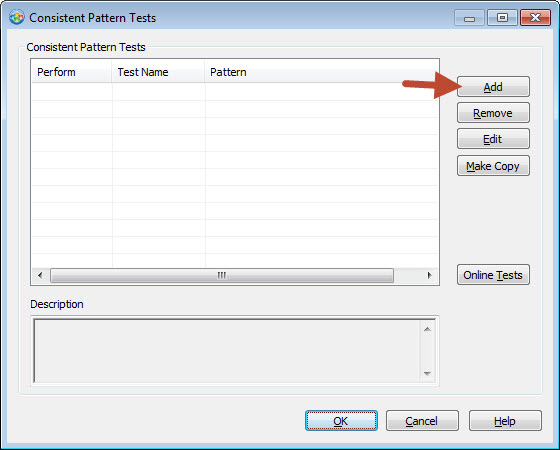
Now let's create our new Consistent pattern test. Click the Add button.
1- Enter a test name.
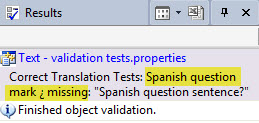
Hint: The name of your test will appear in the result pane, so I find it a good idea to keep the name short yet explicit so you can easily review the report. For example here is a report on a Correct Translation Test for the inverted question mark in Spanish translations. The name of the test is "Spanish question mark ¿ missing":
2- Enter the regular expression to identify variables of type {1}.
The regular expression \{[0-9]+\} will find any instance of a number (any amount of digits) between curly brackets. Let's break it down:
| Syntax | Description |
| \{ | This syntax will find the opening curly bracket. This character needs to be escaped as it has a special meaning in regular expressions. Use the backslash to escape a character. |
| [0-9] | This selects any character within the range defined in the square brackets. In this case any digit between 0 and 9. |
| + | This plus sign following a range means it can be repeated one or more times. It means it will take any number as long as it only contains digits included in the range. For example 1 or 34 or 459784 but not 4,5 |
| \} | This syntax will find the clothing curley bracket. Again using the backslash to escape the curly bracket character. |
Remember when creating a regular expression that each criteria explained above must be present (or true) in order for the regular expression to find the expected text.
3- Enter a description for the test. The more details you add the better. Particularly if you plan to share it online.
4- I entered a test string with variables to check the validity of the test. At this point, after I enter the original text, Catalyst reports the test to fail. Variables {1} and {2} are indeed present in source but not in target. Excellent! :-)
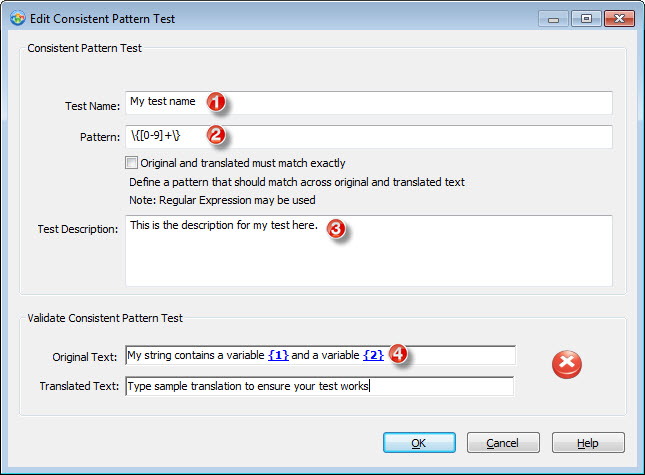
5- Now let's verify we can pass the test if translated correctly. Entering a French translation, Catalyst reports the test passes as I have 2 variables present, just like in source.

6- You will have of course realised that our translation above has different variable digits, which is most likely not something we want in our translation.
Tick the Original and translated must match exactly checkbox in order to test that the variables are present in source and target and match.
Once you check this option, Catalyst reports a failed test again. Just what we wanted :-)
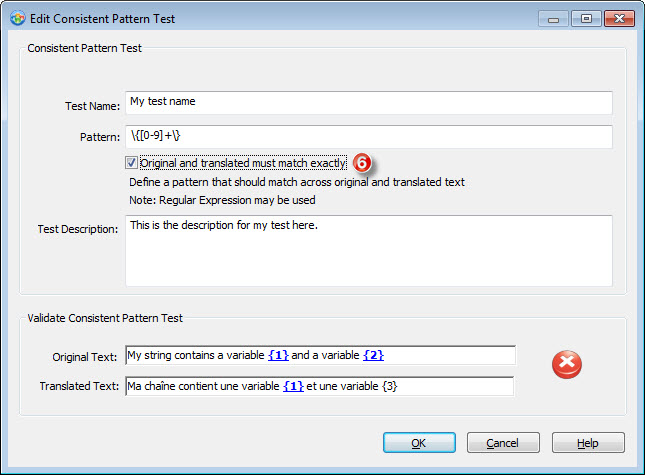
7- Simply changing the second variable digit in our translation sets Catalyst to report the test passes.
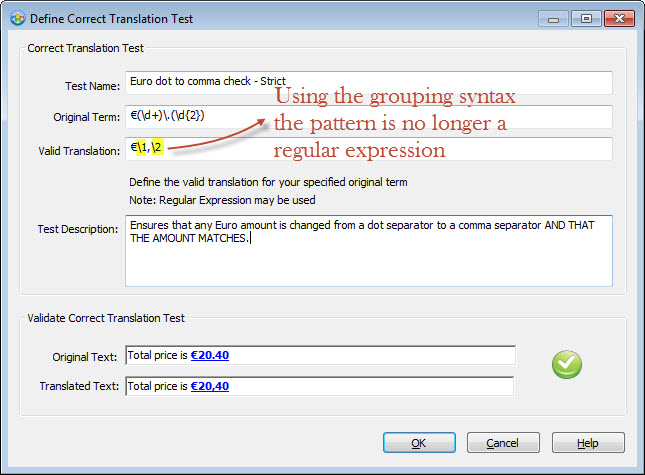
Building a Correct Translation Test
The help in the software contains a good example on building a Correct Translation test, so I will not go over the steps again as above. However there is an important technical point I want to bring to your attention.
When building a Correct Translation Test, you get to enter 2 patterns. One pattern to search the source string and one pattern to search the target string. While developing the pattern for the target string, you can opt to refer to groups defined in the source string pattern. What we call Strict Checking, where the Original Term should remain the same in the translation.
By default patterns are regular expressions. Using the grouping syntax (e.g. \1 or \2) in the valid translation definition results in the pattern becoming standard text, i.e. it is no longer a regular expression pattern.
Accessing the Online Test Repository
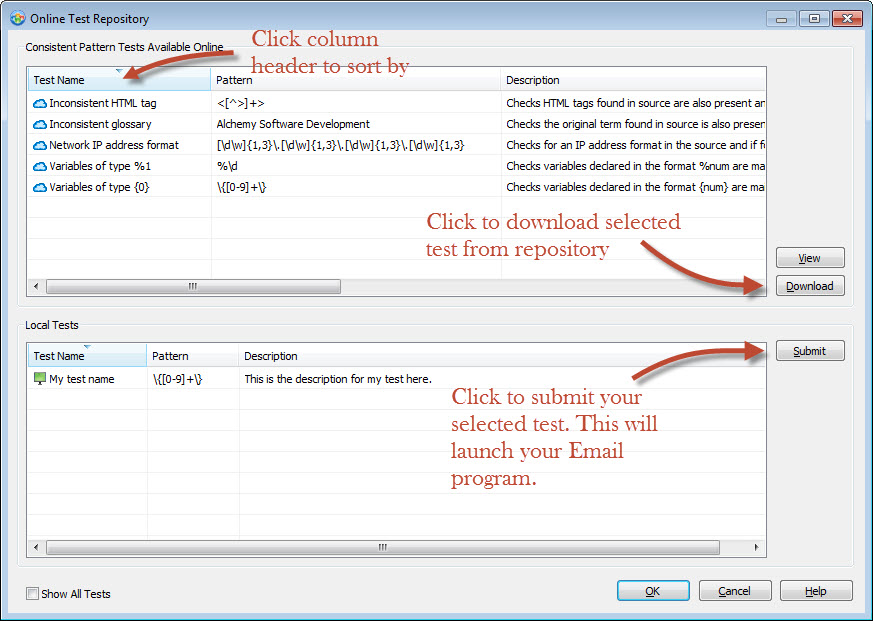
User defined validation tests are available in the Online Test Repository. For each of the 3 types of test, you can access more tests online by clicking the Online Tests button.
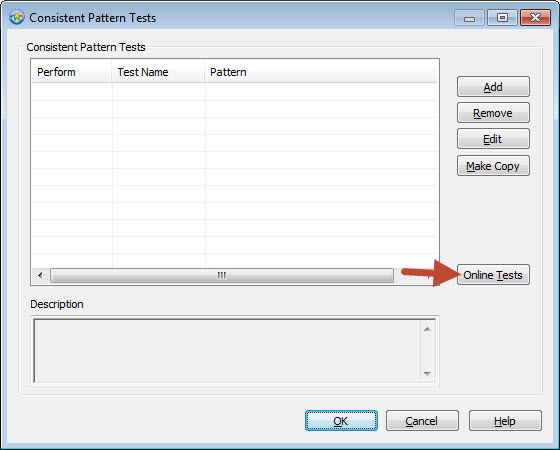
From there you will be able to browse the existing and ever growing list of tests. You can also submit your own tests to share with other Alchemy Catalyst 10 Pro users. My team and I will review the test and publish if suitable. This process is not automatic and not all tests will be published.
I am sure you will appreciate the versatility and power of the Validation Expert now available in Catalyst 10. I hope it greatly enhances the quality of your translations and further reduces localisation issues.
Don't hesitate to contact us to help you develop the regular expression to create your Validation test.
Text Parser Enhancements
Another feature I am genuinely thrilled with in Catalyst 10 comes in the shape of a new and improved Text Parser engine. The new engine greatly improved the Text Parser flexibility.
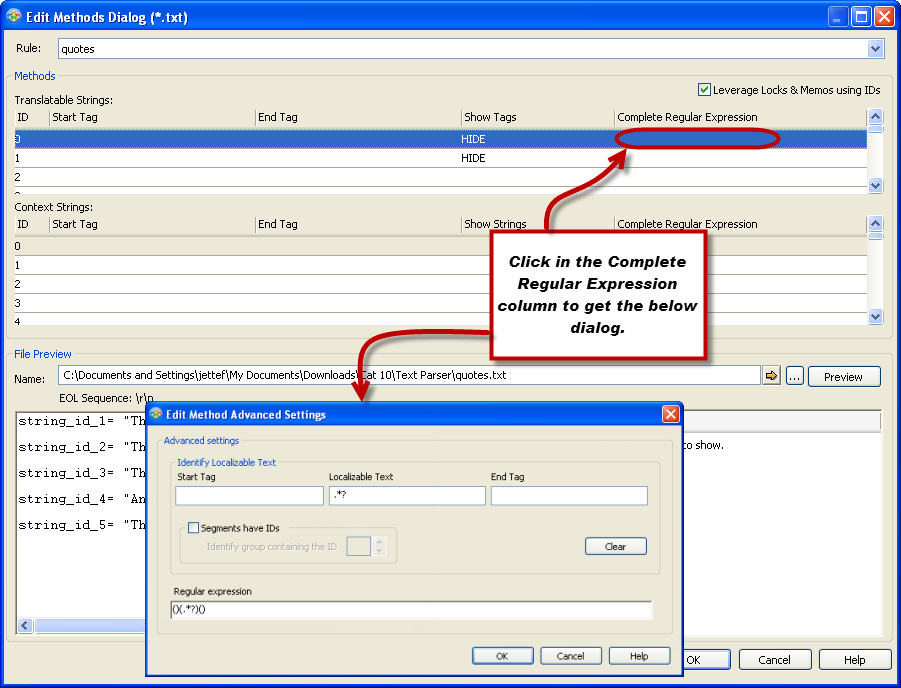
A new Text Parser means a new dialog box. Development has added a new column labelled "Complete Regular Expression", if you click into the cell you will get an Edit Method Advanced Settings dialog box. Let me show you what you can now achieve.
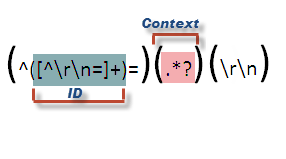
First to understand the changes of the new Text Parser engine, we need to look back on how the Text Parser worked in Catalyst 9 and previous versions. The old Text Parser applied a Regular Expression (RE) to the source file with the following structure.
( )( )( )
This structure breaks down to:
(Start Tag)(Middle Segment)(End Tag)
Where the middle segment is always filled with this hardcoded RE ".*?" which basically means "the shortest anything".
The full stop followed by an asterisks means any character, and the ? makes it non gready.
(Start Tag)(.*?)(End Tag)
For example if we look at the ezParse rule WithIDs for .properties files in Catalyst 9.

Catalyst creates the following RE
and applies it to the source file.
Whatever matches the group in the middle segment is parsed in as localizable text. Moreover, if the Start Tag contains one sub-group, whatever matches this sub-group is parsed in as the String ID. However, if the Start Tag has more than one sub-group, then there is no way to specify a String ID.
The main change of the new Text Parser is that the middle segment of the regular expression is now exposed and we are able to edit it - this is the segment that matches the localizable text in your text files, in which we can now apply conditions with regular expressions.
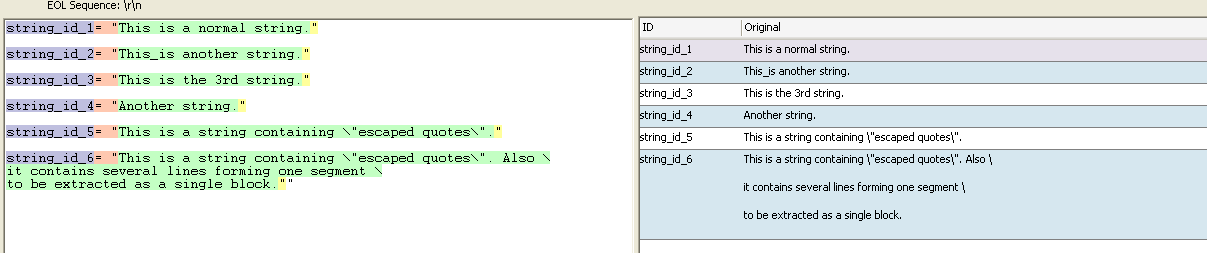
If we take this sample text file, which contains escaped quotes in string_id_5. With previous versions of Catalyst, you would have been unable to parse the full string due to the quotes within it, eventhough they are escaped.
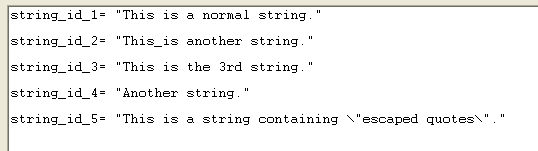
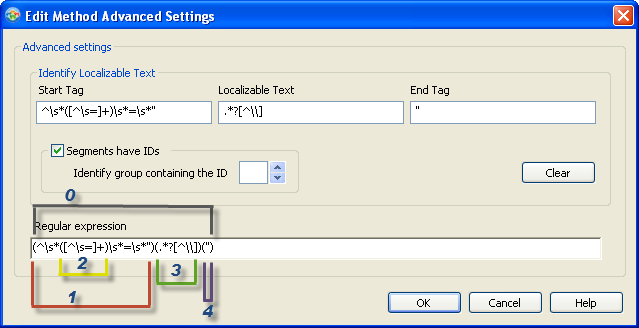
We are now able to parse string_id_5 into Catalyst 10 with the help of the new Text Parser and the following RE:
Start Tag: ^\s*([^\s=]+)\s*=\s*"
Middle : .*?[^\\]
End Tag: "
With the ability to have a regular expression in the middle part, we can select characters which are not consumed by the end tag. Something impossible in previous version of Catalyst. So for instance in this example, the end tag is a double quote but if it is not preceded by a backslash (defined in middle tag).
As you can see in the screenshot below we have also set the second sub-group of the Start Tag as the string ID (click image to enlarge).
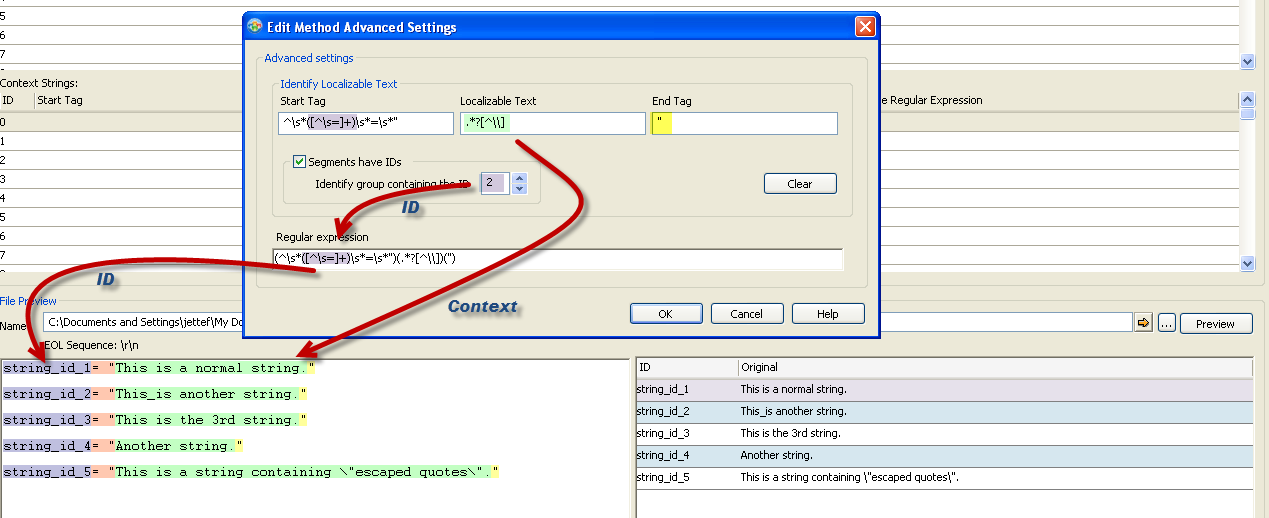
String IDs are not set any more by only adding a set of brackets in the StartTag, instead you will need to tick the "Segments have IDs" check box and use the up or down button to set the String ID accordingly (alternatively you can also type the number of the sub-group into the box directly). In our example you can choose between 0 – 4.
With this enhancement, you can select any part of the RE as a String ID , you are not limited to only the Start Tag as in the previous versions of Catalyst. Unlike in Catalyst 9, it is now possible to parse a String ID, even when there are several sub-groups. When setting the String ID, Catalyst 10 will automatically highlight the according sub-group in the Regular expression box.
Furthermore, without changing the above RE we can now also parse in segments that consist of multiple lines (click image to enlarge):
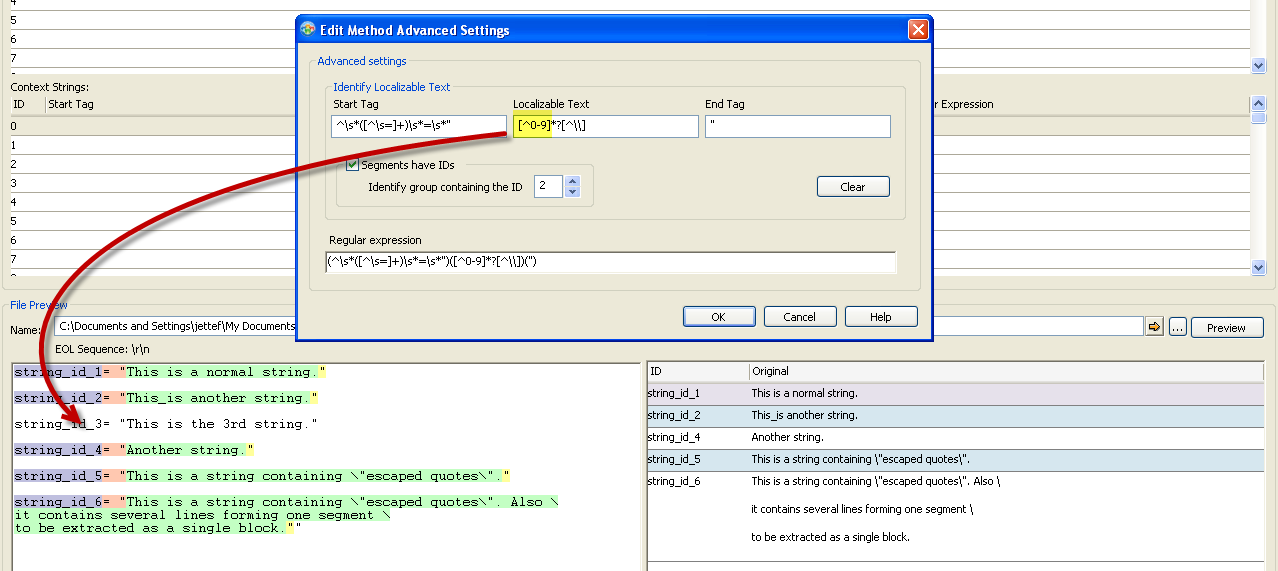
Now, that we are able to modify the middle segment of the Text Parser, it is also easier to exclude strings from being parsed.
Let’s say we want to exclude strings that contain numbers. To achieve this we only need to modify the middle segment of our RE:
Start Tag: ^\s*([^\s=]+)\s*=\s*"
Middle : [^0-9]*?[^\\]
End Tag: "
(click image to enlarge)
The new Text Parser engine gives enhanced control using Regular Expressions to parse the source file. This will greatly increase the panel of text based files which you can now support within the tool. Don't hesitate to contact us at Support to help you build your text parsing rules.
Case Study: Automating the localization process
Presented by Robert O'Keefe at CITRIX Research and Development, this Case Study presents the automation developed to improve efficiencies and reduce the time to market by 35% with Alchemy Catalyst.
Download this article: Automating the localization process.
White Papers: Localization Services in the Cloud
Alchemy Catalyst is building services in the cloud giving the users the opportunity to build on each other's experience and knowledge.
Download our article on introducing cloud technology in Catalyst 10:L10n Services in the Cloud
In addition to the articles included each quarter in this TechBytes Email, I will also include a white papers or case studies. Something you can get your teeth into if you have a bit more time. As we are increasing our library of white papers and case studies, I'd be happy to present on your behalf any topics that would make for a good technical reading.
Conclusion
Thanks for taking the time to read this instalment of TechBytes. It has been fun to write and I hope you found some or all of it beneficial. We always welcome new article ideas, so if there is a feature you feel works really well and is worth mentioning, or indeed if clarification on a particular topic would help you, please let me know so together we can make TechBytes as useful as possible for everyone.
My best wishes
Cyril Vallin
![]()